// Kernel function to add the elements of two arrays __global__ // __global__ 表示其将在 GPU 上运行 void add(int n, float *x, float *y) { for (int i = 0; i < n; i++) y[i] = x[i] + y[i]; }
int main(void) { int N = 1<<20; // 1M elements
float *x = new float[N]; float *y = new float[N];
// initialize x and y arrays on the host for (int i = 0; i < N; i++) { x[i] = 1.0f; y[i] = 2.0f; }
// float *dev_x, *dev_y; int size = N * sizeof(float); cudaError_t err err = cudaMalloc((void **)&dev_x, size); // 在 GPU 上分配内存 if (err != cudaSuccess) { printf("%s in %s at line %d\n", cudaGetErrorString(err),__FILE__,__LINE__); exit(EXIT_FAILURE); } err = cudaMalloc((void **)&dev_y, size); if (err != cudaSuccess) { printf("%s in %s at line %d\n", cudaGetErrorString(err),__FILE__,__LINE__); exit(EXIT_FAILURE); } cudaMemcpy(dev_x, x, size, cudaMemcpyHostToDevice); // 把输入数据从 Host 内存到 Device 内存 cudaMemcpy(dev_y, y, size, cudaMemcpyHostToDevice);
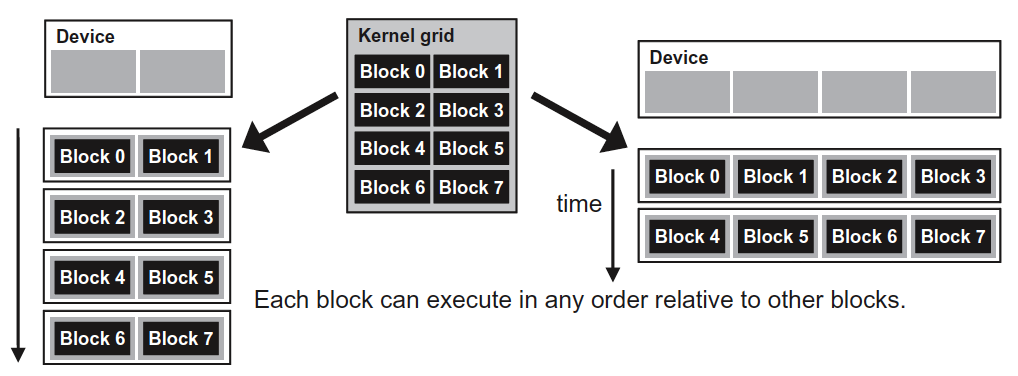
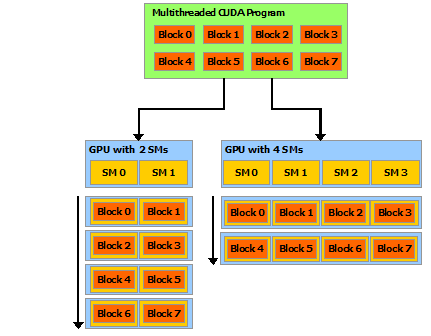
Scalability and thread reuse. By using a loop, you can support any problem size even if it exceeds the largest grid size your CUDA device supports. Moreover, you can limit the number of blocks you use to tune performance.
Debugging. By using a loop instead of a monolithic kernel, you can easily switch to serial processing by launching one block with one thread. add<<<1, 1>>>(N, x, y); This makes it easier to emulate a serial host implementation to validate results.
Portability and readability. The grid-stride loop code is more like the original sequential loop code than the monolithic kernel code, making it clearer for other users.
Warps are groups of (32) threads that execute simultaneously
3.2. 映射线程到多维数据(RGB 转灰度图片实例)
grid 可以是 1D,2D,3D,block 也可以是 1D,2D,3D,那我们应该如何选择线程的组织形式呢?这往往由待处理数组的结构的决定。 比如,处理图片时,由于图片是像素点的二维数组,这时采用 2D grid 和 2D block 是个不错的选择。假设,现在要处理图片的像素规模为 x×y=76×62 。我们决定采用 16 x 16 的 2D block,这时 x 方向上至少需要 5 block,而 y 方向上至少需要 4 block,如图 6 所示。
Figure 6: Using a 2D thread grid to process a 76 × 62 picture P.
从图 6 中可以看到,在 x 方向上有 4 个多余的线程,在 y 方向上有 2 个多余的线程。在 kernel 函数中通过边界检查让多余线程不执行操作即可。
假设 GPU 任务为 RGB 彩色图片转灰色图片,则可以这样启动 kernel:
1
2
3
4
5
int m = 76;
int n = 62;
dim3 dimGrid(ceil(m/16.0), ceil(n/16.0), 1);      // 5 x 4 x 1
dim3 dimBlock(16, 16, 1);                         // 16 x 16 x 1
colorToGreyscaleConversion<<<dimGrid,dimBlock>>>(d_Pin, d_Pout, m, n);
// we have 3 channels corresponding to RGB
// The input image is encoded as unsigned characters [0, 255]
__global__
void colorToGreyscaleConversion(unsigned char * Pout, unsigned
                                char * Pin, int width, int height) {,
    int Col = threadIdx.x + blockIdx.x * blockDim.x;        // threadIdx.x: [0, 15] ,blockIdx.x: [0, 4],blockDim.x 总是为 16
    int Row = threadIdx.y + blockIdx.y * blockDim.y;        // threadIdx.y: [0, 15] ,blockIdx.y: [0, 3],blockDim.y 总是为 16
    if (Col < width && Row < height) {                      // 多余的线程不会通过这个边界检查
        // get 1D coordinate for the grayscale image
        int greyOffset = Row*width + Col;
        // one can think of the RGB image having
        // CHANNEL times columns than the grayscale image
        int rgbOffset = greyOffset*CHANNELS;                // RGB 有 3 个通道,CHANNELS 为 3
        unsigned char r = Pin[rgbOffset ]; // red value for pixel
        unsigned char g = Pin[rgbOffset + 2]; // green value for pixel
        unsigned char b = Pin[rgbOffset + 3]; // blue value for pixel
        // perform the rescaling and store it
        // We multiply by floating point constants
        Pout[grayOffset] = 0.21f*r + 0.71f*g + 0.07f*b;     // RGB 转灰色的公式
    }
}
3.3. 图片模糊处理实例
下面看一个更复杂的图片处理例子——图片模糊处理。
图片模糊处理的一种方式就是“把当前像素相邻的几个像素的平均值”作为当前像素的值,如图 7 所示,它取的是 3 x 3 小窗口里的像素的平均值(当然这个小窗口也可以更大,如 5 x 5 或 7 x 7 等)。
Figure 7: Each output pixel is the average of a patch of pixels in the input image.
__global__
void blurKernel(unsigned char * in, unsigned char * out, int w, int h) {
    int Col = threadIdx.x + blockIdx.x * blockDim.x;
    int Row = threadIdx.y + blockIdx.y * blockDim.y;
    if (Col < w && Row < h) {
        int pixVal = 0;
        int pixels = 0;

        // Get the average of the surrounding BLUR_SIZE x BLUE_SIZE box
        for (int blurRow = -BLUR_SIZE; blurRow < BLUR_SIZE + 1; ++blurRow) {
            for (int blurCol = -BLUE_SIZE; blurCol < BLUR_SIZE + 1; ++blurCol) {
                int curRow = Row + blurRow;
                int curCol = Col + blurCol;

                // Verify we have a valid image pixel
                if (curRow > -1 && curRow < h && curCol > -1 && curCol < w) {
                    pixVal += in[curRow * w + curCol];
                    pixels++; // Key track of number of pixels in the avg
                }
            }
        }

        // Write our new pixel value out
        out[Row * w + Col] = (unsigned char)(pixVal / pixels);
    }
}
上面代码中,如果计算 3 x 3 小窗口里的像素的平均值(9 个像素点的平均值),则 BLUE_SIZE = 1;如果计算 5 x 5 小窗口里的像素的平均值(25 个像素点的平均值),则 BLUE_SIZE = 2。
// Get the average of the surrounding BLUR_SIZE x BLUE_SIZE box
for (int blurRow = -BLUR_SIZE; blurRow < BLUR_SIZE + 1; ++blurRow) {
    for (int blurCol = -BLUE_SIZE; blurCol < BLUR_SIZE + 1; ++blurCol) {
        int curRow = Row + blurRow;
        int curCol = Col + blurCol;

        // Verify we have a valid image pixel
        if (curRow > -1 && curRow < h && curCol > -1 && curCol < w) {
            pixVal += in[curRow * w + curCol];
            pixels++; // Key track of number of pixels in the avg
        }
    }
}
在内层 for 循环的每次迭代中,有 1 次 Global Memory 的访问(即对 in[] 数组的访问),有 1 次浮点数的加法运算(即 pixVal += in[curRow * w + curCol] )。
我们把“浮点运算次数”和“取内存次数”的比值定义为 compute-to-globalmemory-access ratio (CGMA),对于上面例子有: 浮点运算次数访问次数CGMA=浮点运算次数Global Memory 访问次数=11=1.0
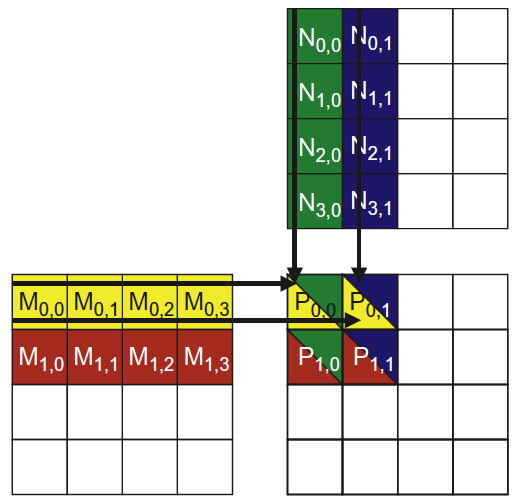
__global__
void MatrixMulKernel(float* M, float* N, float* P, int Width) {
    // Calculate the row index of the P element and M
    int Row = blockIdx.y * blockDim.y + threadIdx.y;
    // Calculate the column index of P and N
    int Col = blockIdx.x * blockDim.x + threadIdx.x;
    if ((Row < Width) && (Col < Width)) {
        float Pvalue = 0;
        // each thread computes one element of the block sub-matrix
        for (int k = 0; k < Width; ++k) {
            Pvalue += M[Row*Width+k] * N[k*Width+Col];
        }
        P[Row*Width+Col] = Pvalue;
    }
}
int bx = blockIdx.x; int by = blockIdx.y; int tx = threadIdx.x; int ty = threadIdx.y; // Identify the row and column of the d_P element to work on int Row = by * TILE_WIDTH + ty; int Col = bx * TILE_WIDTH + tx; float Pvalue = 0; // Loop over the d_M and d_N tiles required to compute d_P element for (int ph = 0; ph < Width/TILE_WIDTH; ++ph) { // Collaborative loading of d_M and d_N tiles into shared memory Mds[ty][tx] = d_M[Row*Width + ph*TILE_WIDTH + tx]; Nds[ty][tx] = d_N[(ph*TILE_WIDTH + ty)*Width + Col]; __syncthreads(); // 确保当每个线程需要的数据被不同线程加载到 Shared memory 中后,同 block 中的线程才往下执行 for (int k = 0; k < TILE_WIDTH; ++k) { Pvalue += Mds[ty][k] * Nds[k][tx]; } __syncthreads(); // 确保当所有线程都执行完上面的计算后,同 block 中的线程才往下执行 } d_P[Row*Width + Col] = Pvalue; }
$ nvprof matrixMul [Matrix Multiply Using CUDA] - Starting... ==27694== NVPROF is profiling process 27694, command: matrixMul GPU Device 0: "GeForce GT 640M LE" with compute capability 3.0
MatrixA(320,320), MatrixB(640,320) Computing result using CUDA Kernel... done Performance= 35.35 GFlop/s, Time= 3.708 msec, Size= 131072000 Ops, WorkgroupSize= 1024 threads/block Checking computed result for correctness: OK
Note: For peak performance, please refer to the matrixMulCUBLAS example. ==27694== Profiling application: matrixMul ==27694== Profiling result: Time(%) Time Calls Avg Min Max Name 99.94% 1.11524s 301 3.7051ms 3.6928ms 3.7174ms void matrixMulCUDA<int=32>(float*, float*, float*, int, int) 0.04% 406.30us 2 203.15us 136.13us 270.18us [CUDA memcpy HtoD] 0.02% 248.29us 1 248.29us 248.29us 248.29us [CUDA memcpy DtoH]