switch (backgroundColor) { case Color::DarkBlue: case Color::Black: // Code to execute for both a dark blue or black background color break; case Color::Red: // Code to execute for a red background color break; }
switch (backgroundColor) { case Color::DarkBlue: doSomethingForDarkBlue () ; [[fallthrough]] ; case Color::Black: // Code is executed for both a dark blue or black background color doSome thingForBlackOrDarkBlue(); break; case Color::Red: case Color::Green: // Code to execute for a red or green background color break; }
// Create a vector of integers vector<int> myVector = { 11, 22 }; // Add some more integers to the vector using push_ back() myVector.push_back(33); myVector.push_back(44);
auto mySimpleSmartPtr = make_unique<Simple>() ; processData(mySimpleSmartPtr.get());
可释放unique_ptr的底层指针,并使用reset()根据需要将其改成另一个指针。例如:
1 2 3 4
mySimpleSmartPtr.reset(); // Free resource and set to nullptr mySimpleSmartPtr.reset (newSimple()); // Free resource and set to a new // Simple instance
voiduseResource(weak_ptr<Simple>& weakSimple){ auto resource = weakSimple.lock(); if (resource) cout << "Resource still alive." << endl; else cout << "Resource has been freed!" << endl; } intmain(){ auto sharedSimple = make_shared<Simple>() ; weak_ptr<Simple> weakSimple(sharedSimple); // Try to use the `weak_ptr`. useResource(weakSimple) ; // Reset the shared_ptr. // Since there is only 1 `shared_ptr`to the Simple resource, this will // free the resource, even though there is still a `weak_ptr` alive. sharedSimple.reset(); // Try to use the `weak_ptr` a second time. useResource (weakSimple); return0; }
上述代码的输出如下:
1 2 3 4
Simple constructor called! Resource still alive. Simple destructor called! Resource has been freed!
auto smartCellp = make_unique<SpreadsheetCell>(4); //... do something with the cell, no need to delete the smart pointer // Or with raw pointers, without smart pointers (not recommended) SpreadsheetCell* myCellp = newSpreadsheetCell(5); SpreadsheetCe11* anotherCellp = nullptr; anotherCellp = newSpreadsheetCell (4) ; // ... do something with the cells delete myCellp; myCellp = nullptr; delete anotherCellp; anotherCellp = nullptr;
SpreadsheetCell myCell(); // WRONG, but will compile. myCell.setValue (6); // However, this line will not compile. cout << "cell 1:"<< myCell.getValue() << endl;
auto smartcellp = make_unique<SpreadsheetCell>(); // Or with a raw pointer (not recommended) SpreadsheetCell* myCellp = newSpreadsheetCell (); // SpreadsheetCell* myCellp = new SpreadsheetCell;
classEvenSequence { public: EvenSequence (initializer_ list<double> args) { if (args.size() % 2 != 0) throw invalid_ argument ("initializer_ list should contain even number of elements."); mSequence. reserve(args.size()); for (constauto& value : args) mSequence.push_back (value); } voiddump()const{ for (constauto& value : mSequence) cout << value << ", "; cout << endl; private: vector<double> mSequence; };
voidDerived::someOtherMethod(){ cout << "I can access base class data member mProtectedInt." << endl; cout << "Its value is "<< mProtectedInt << endl; }
Derived myDerived; Base assignedobject = myDerived; //Assigns a Derived to a Base . assignedObject.someMethod(); // Calls Base's version of someMethod()
classBase { public: voidgo(){ cout << "go() called on Base" << endl; } }; classDerived : public Base { public: voidgo(){ cout << "go() called on Derived" << endl; } };
试着用Derived对象调用go()方法好像没有问题。
1 2
Derived myDerived; myDerived.go();
正如预期的那样,这个调用的结果是“go() called on Derived”。然而,由于这个方法不是virtual,因此实际上没有被重写。相反,Derived类创建了一个新的方法,名称也是go(),这个方法与Base类的go()方法完全没有关系。为证实这一点,只需要用Base指针或引用调用这个方法:
你可能希望输出是“go() called on Derived”,但实际上,输出是“go() called on Base”。这是因为ref变量是一个Base引用,并省略了virtual关键字。当调用go()方法时,只是执行了Base类的go()方法。由于不是虛方法,不需要考虑派生类是否重写了这个方法。
在C++中,有些特性提供了对象的运行时视角。这些特性通常归属于一个名为运行时类型信息(RunTime Type Information, RTTI)的特性集。RTTI的一个特性是typeid运算符,这个运算符可在运行时查询对象,从而判别对象的类型。大多数情况下,不应该使用typeid,因为最好用虚方法处理基于对象类型运行的代码。下面的代码使用了typeid,根据对象的类型输出消息:
handleMessage("Hello World"); // A literal is not an lvalue. std::string a = "Hello "; std::string b = "World"; handleMessage(a + b); // A temporary is not an 1value .
classDerived : public Base { public: virtual ~Derived() = default; };
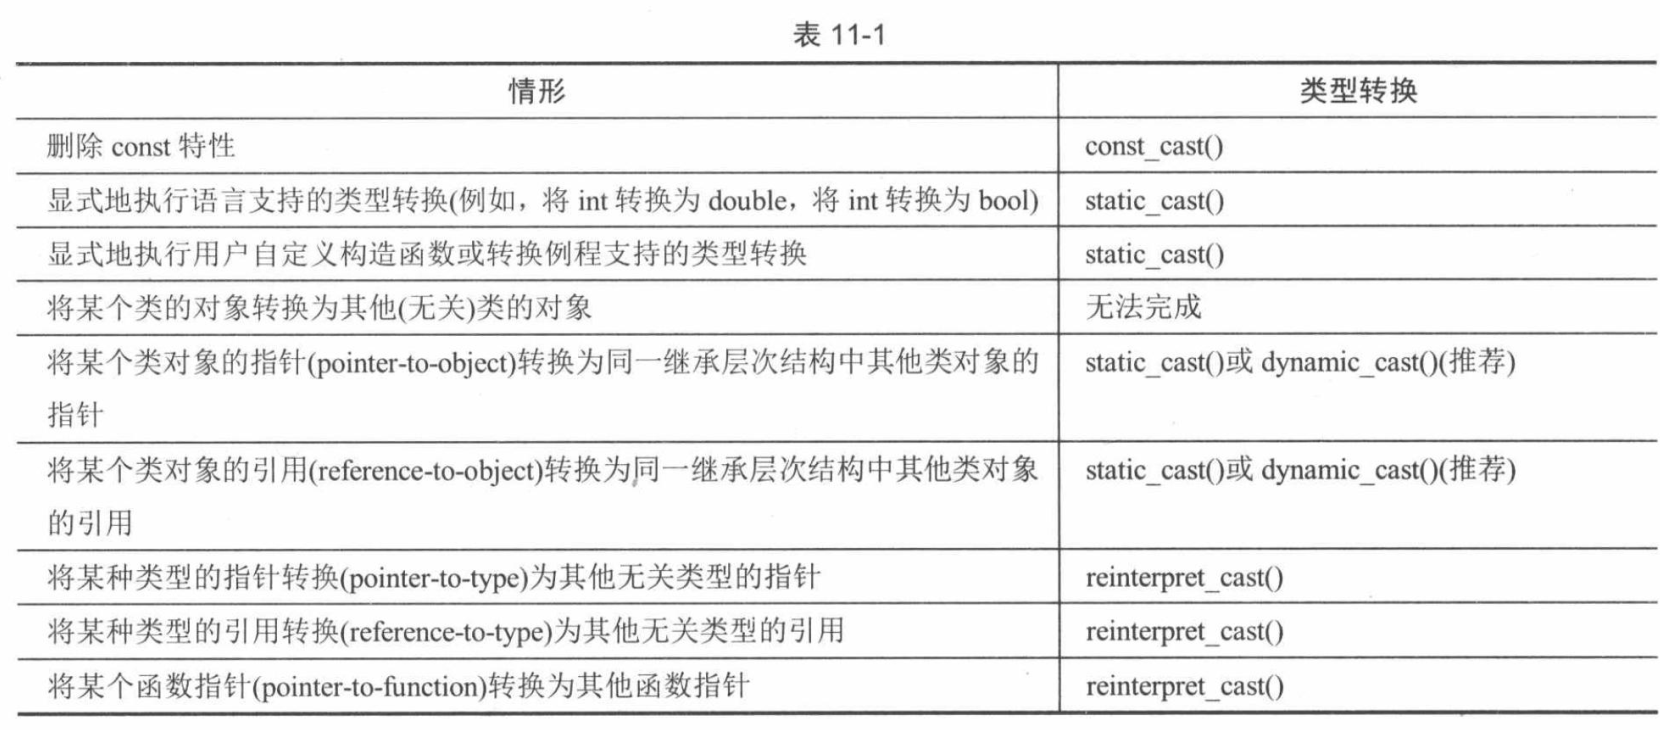
intmain(){ Base* b; Derived* d = newDerived(); b = d; // Don't need a cast to go up the inheritance hierarchy d = static_cast<Derived*>(b); // Need a cast to go down the hierarchy
Base base; Derived derived; Base& br = derived; Derived& dr = static_cast<Derived&> (br) ; return0; }
intmain(){ X x; Y y; X* xp = &x; Y* yp = &y; // Need reinterpret cast for pointer conversion from unrelated classes // static_cast doesn't work. xp = reinterpret_cast<X*>(yp); // No cast required for conversion from pointer to void* void* p = xp; // Need reinterpret cast for pointer conversion from void* xp = reinterpret_cast<X*>(p) ; // Need reinterpret cast for reference conversion from unrelated classes // static_cast doesn't work. X& xr = x; Y& yr = reinterpret_cast<Y&>(x); return0; }
switch (backgroundColor) { case Color::DarkBlue: doSomethingForDarBlue(); [[fallthrough]]; case Color::Black: // Code is executed for both a dar blue or black background color doSomethingForBlackOrDarkBlue(); break; case Color::Red: case Color::Green: // Code to execute for a red or green background color break; }
std::complex<longdouble> operator""_i (constchar* p) // Implementation omitted; it requires parsing the C-style // string and converting it to a complex number
Grid<int> myIntGrid; // declares a grid that stores ints, Grid<double> myDoubleGrid(11, 11); // declares an 11x11 Grid of doubles myIntGrid.at(0, 0) = 10; int x = myIntGrid.at(0, 0).value_or(0);
非类型的模板参数只能是整数类型(char、int、 long 等)、枚举类型、指针、引用和std:nullptr_t。从C++17开始,可指定auto、auto&和auto*等作为非类型模板参数的类型。此时,编译器会自动推导类型。在模板列表中指定非类型参数而不是在构造函数中指定的主要好处是:在编译代码之前就知道这些参数的值了。下面是新的类定义:
template <typename T> template <typename E> Grid<T>& Grid<T>::operator= (const Grid<E>& rhs) { Grid<T> temp(rhs); // Do all the work in a temporary instance swap(temp) ; // Commit the work with only non-throwing operations return *this; }
vold getReservationData(){ string guestName; int partySize = 0; // Read characters until we find a digit char ch; cin >> noskipws; while (cin >> ch) { if (isdigit(ch)) { cin.unget(); if(cin.fail ()) cout << "unget() failed" << endl; break; } guestName += ch; } // Read partysize, if the stream is not in error state if (cin) cin >> partySize; if (!cin) { cerr << "Error getting party size." << endl; return; }
cout << "Thank you " << guestName << ", party of " << partysize << endl; if (partysize> 10) { cout << "An extra gratuity will apply." << endl; } }
ifstream inFile("input.txt"); // Note:input.txt must exist. ofstream outFile("output.txt"); // Set up a link between inFile and outFile. inFile.tie (&soutFile);
// output some text to outFile. Normally, this would // not flush because std::endl is not sent. outFlle << "Hello there!"; // outFlle has NOT been. flushed. // Read some text from inF1le. This w111 trigger flush() // on outFile string nextToken; inFile >> nextToken; // outFile HAS been flushed.
try { // code which may result in an exception being thrown } catch (exception-type1 exception-name) { // code which responds to the exception of type 1 } catch (except ion-type2 exception-name) { // code which responds to the exception of type 2 }
vector<int> readIntegerFile(string_view fileName){ ifstream inputstream(fileName.data()); if (inputstream.fail()) { // We failed to open the file:throw an exception throw5; } }
此后必须修改catch语句:
1
2
3
4
5
6
try { myInts = readIntegerFile (fileName); } catch (int e) { cerr << "Unable to open file "<< fileName << "(" << e << ")" << endl; return1; }
vector<int> readIntegerFile(string_view fileName){ ifstream inputStream(fileName .data()); if (inputStream.fail()) { // We failed to open the file:throw an exception throw"Unable to open file"; } }
vector<int> readIntegerFile(string_view fileName){ ifstream inputstream(fileName.data()); if (inputStream.fail()) throw invalid argument ("Unable to open the file.");
vector<int> integers; int temp; while (inputstream >> temp) integers.push_back(temp); if (!inputstream.eof()) throwruntime_error("Error reading the file."); return integers; }
vector<int> readIntegerFile(string_view fileName){ ifstream inputstream(fileName.data()); if (inputstream.fail()) { // We failed to open the file: throw an exception const string error = "Unable to open file "s + fileName.data(); throwinvalid_argument (error); } // Read the integers one-by-one and add them to a vector vector<int> integers; int temp; while (inputstream >> temp) { integers.push_back(temp); } if (!inputstream.eof()) { const string error = "Unable to read file "s + fileName.data(); throwruntime_error (error); } return integers;
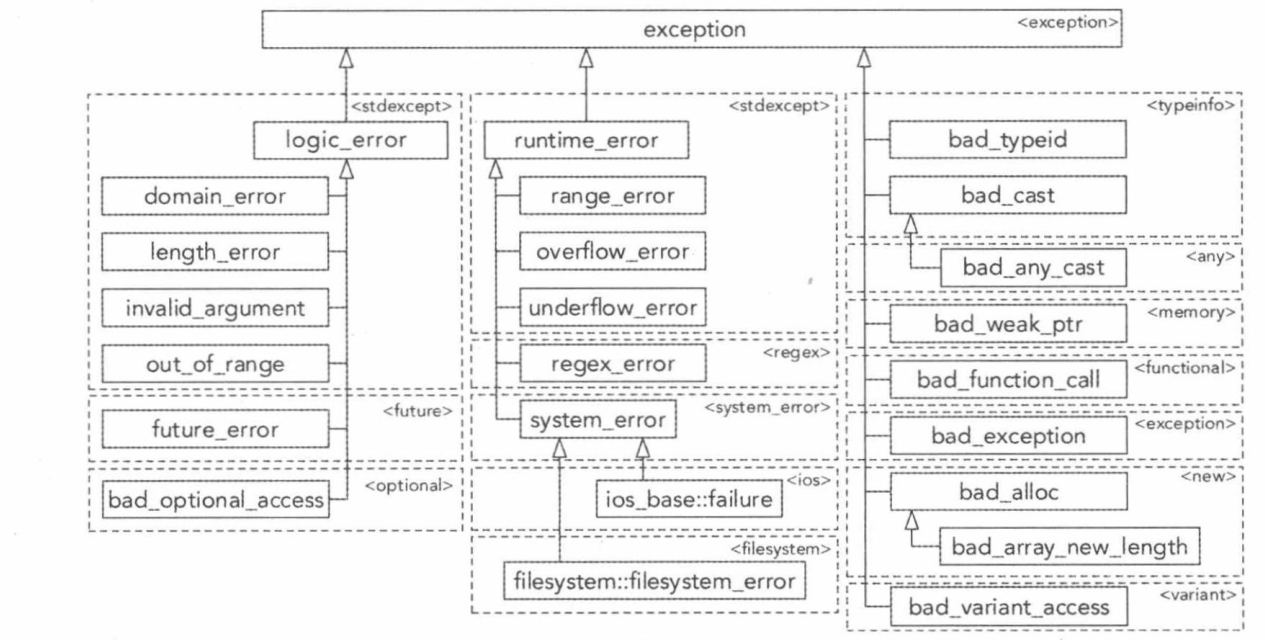
try { myInts = readIntegerFile (fileName) ; } catch (const invalid_argument& e) ( // List the derived class first. // Take some special action for invalid filename s } catch (const exception& e) { // Now list exception cerr << e.what() << endl; return1; }
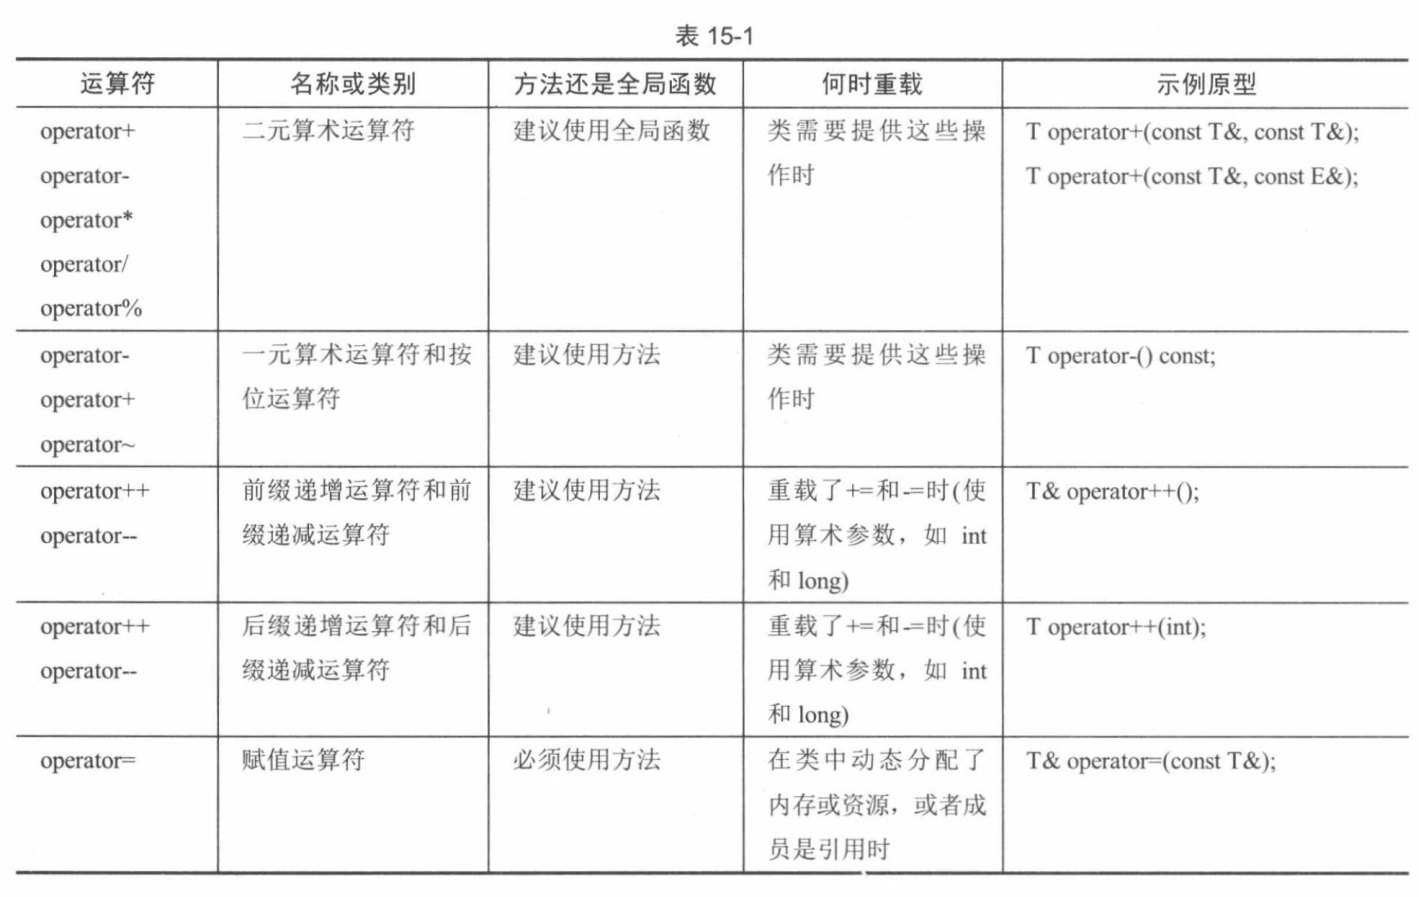
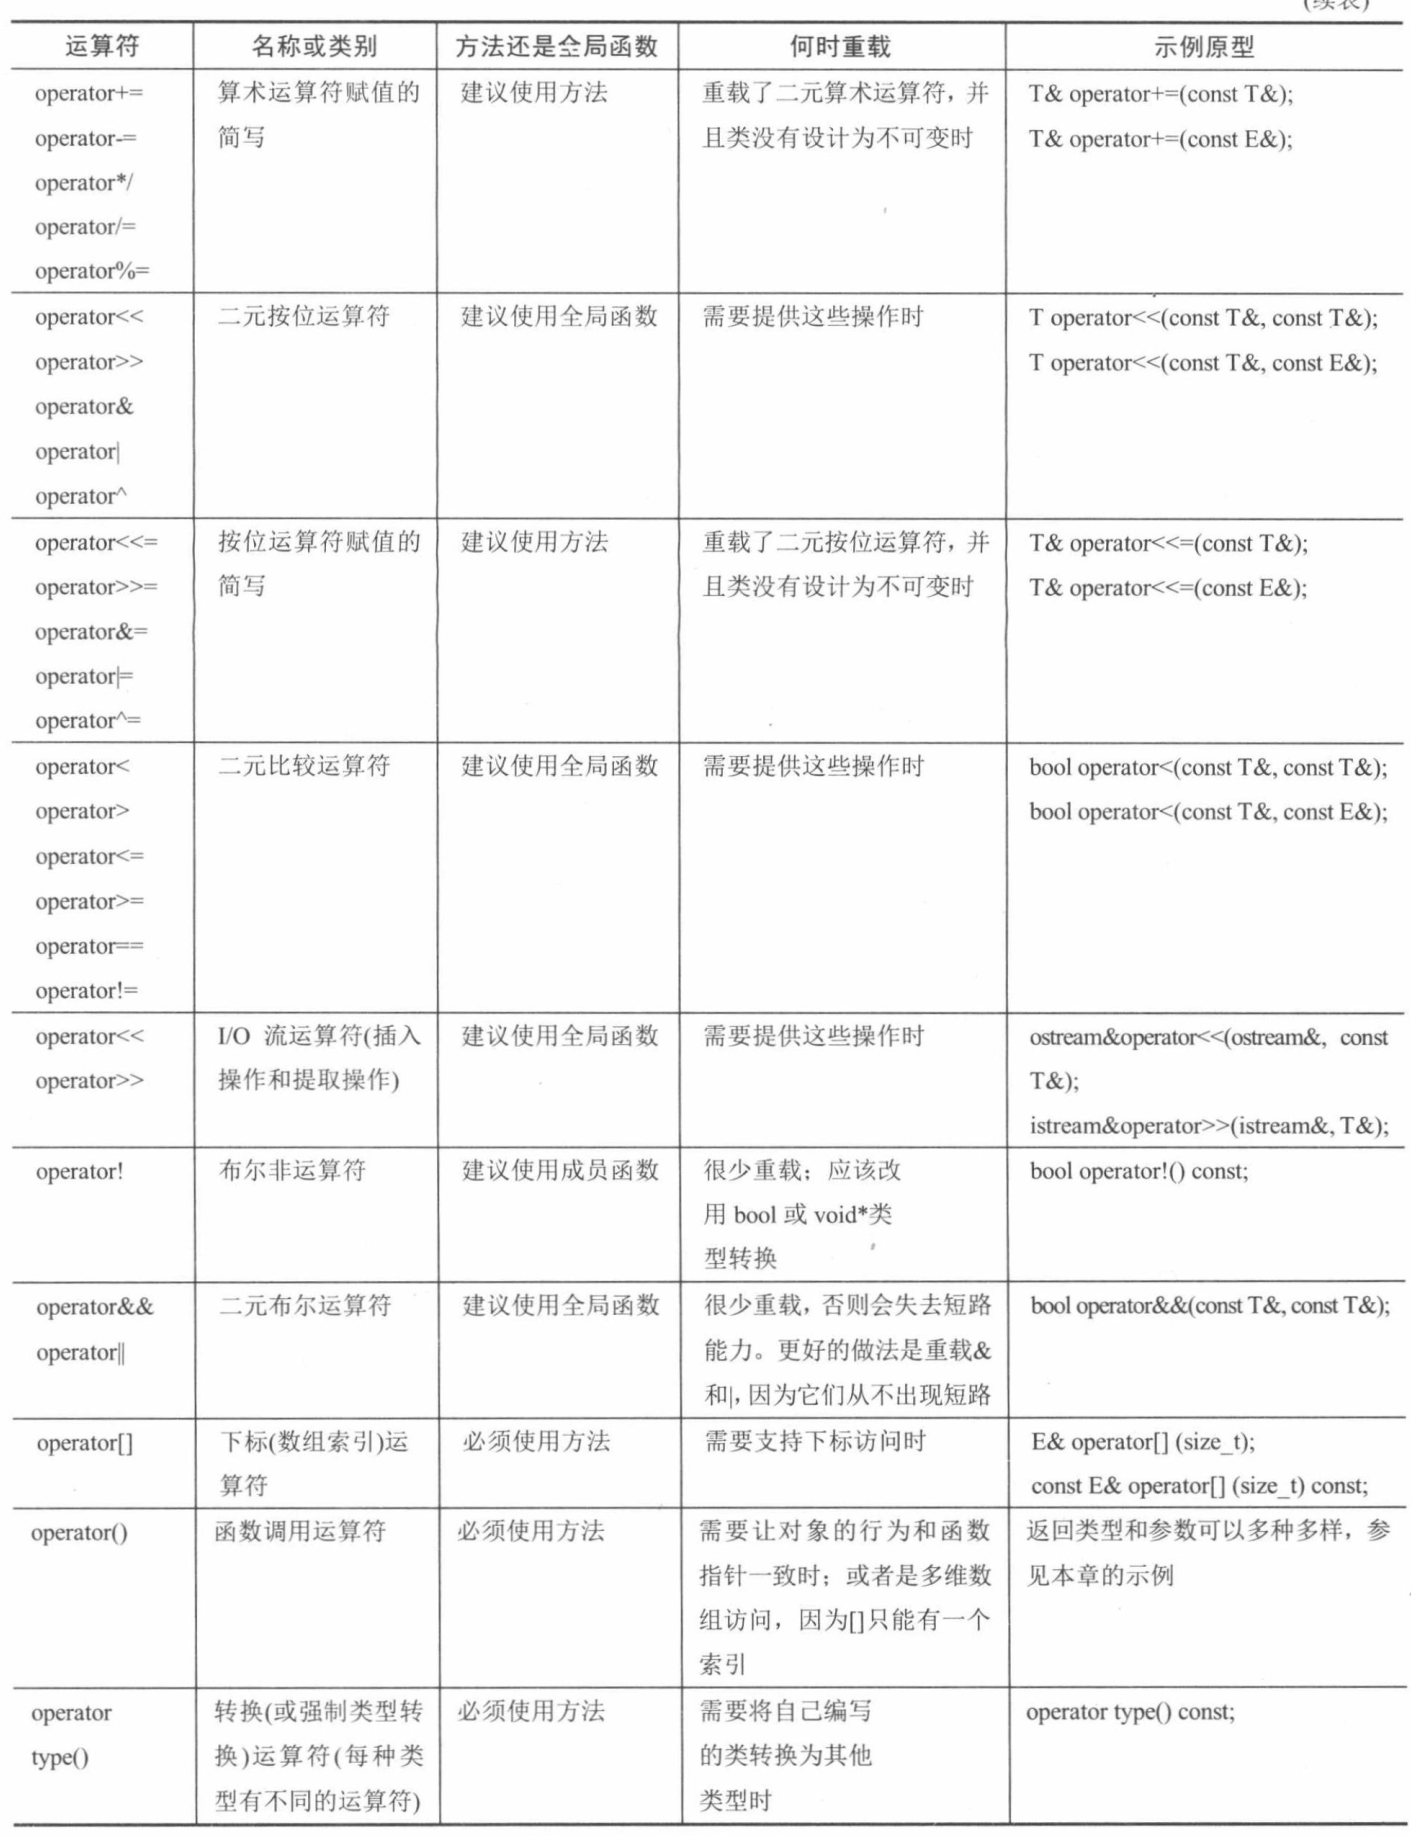
SpreadsheetCell SpreadsheetCell::operator++(int) { autooldCell(*this); // Save current value ++(*this); // Increment using prefix + 1 return oldCell; // Return the old value }
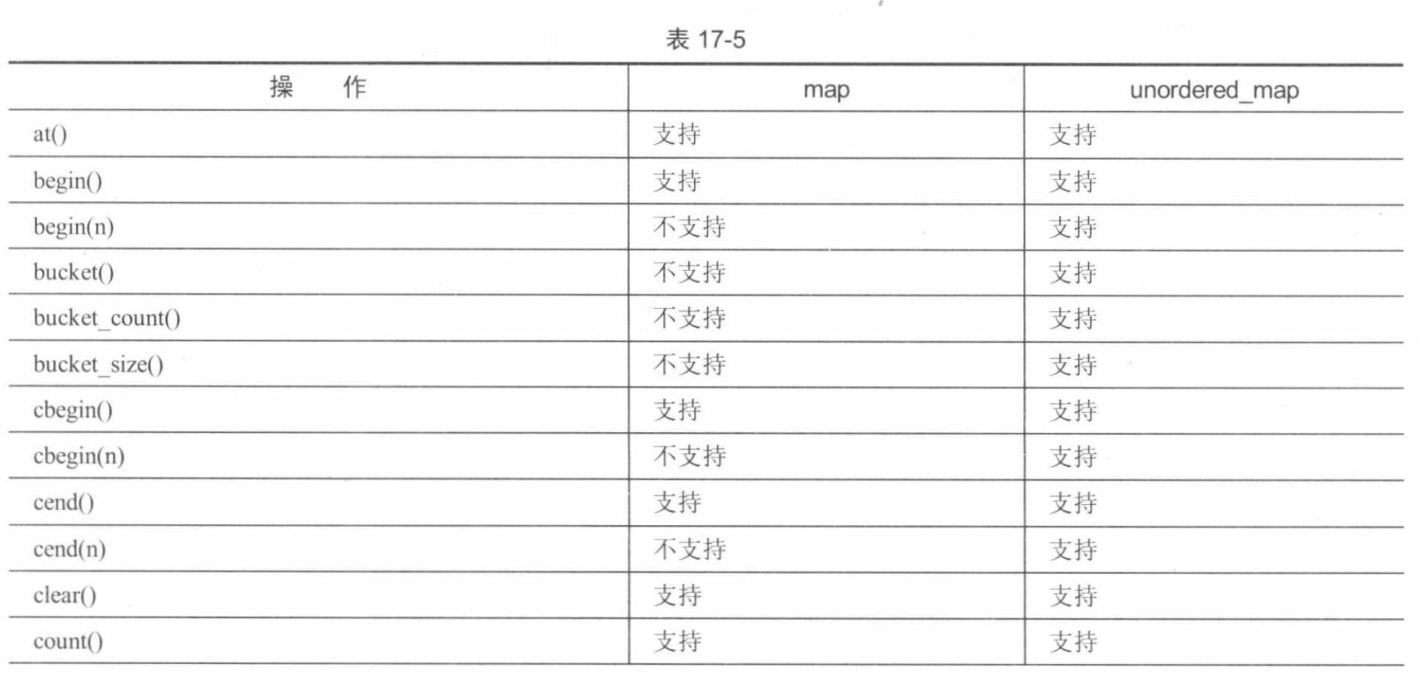
template <classKey, classT, classHash = hash<Key>, Class Pred = std::equal_to<Key>, class Alloc = std::allocator<std::pair<const Key,T>> > class unordered_map;
while (true) { cout <<"Enter a number to lookup (0 to stop):"; cin >> num; if (num -- 0) break; auto endit = cend (myVector); auto it = find(cbegin(myVector), endIt, num); if (it == endit) cout <<"Could not find "<< num << endl;
int main { vector<int> vec{1,2,3,4,5,6,7,8,9}; function<bool (int)> fcn = isEven; auto result = find_if(cbegin(vec), cend(vec), fcn); if (result != cend(vec)) cout <<"First even number:"<< *result << endl; return0; }
auto enditer = end(myVector); auto it = find_if(begin(myVector), endIter, not_fn(perfectScore)); if (it == enditer) cout << "All perfect scores" << endl;
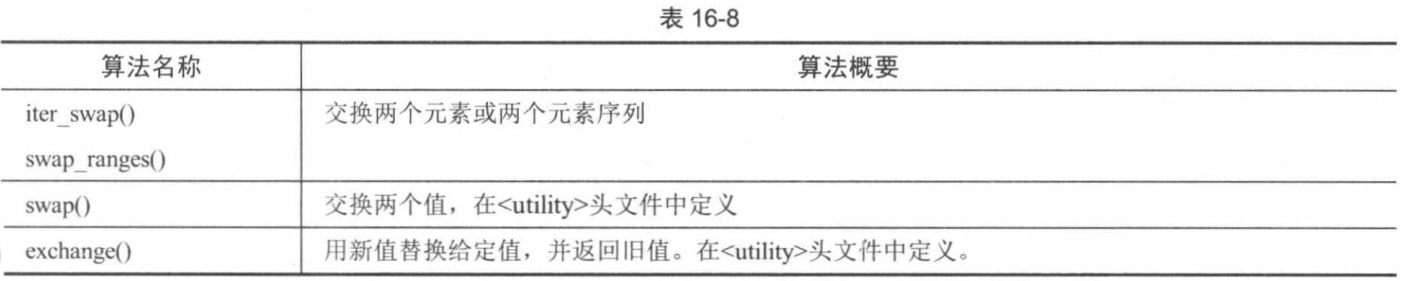
int a = 11; int b = 22; cout << "Before swap(): a = "<< a << ", b = "<< b << endl; swap(a, b); cout << "After swap(): a =" << a << ", b = "<< b << endl;
exchange()
std::exchange()在<utility>中定义,用新值替换旧值,并返回旧值,如下所示:
1 2 3 4 5
int a = 11; int b = 22; cout << "Before exchange(): a = "<< a << ", b = "<< b << endl; int returnedValue = exchange(a, b); cout << "After exchange(): a = " << a << ", b = "<< b << endl;
using string = basic_string<char>; using wstring = basic_string<wchar_t>; using u16string = basic_string<char16_t>; using u32string = basic_string<char32_t>;
using regex = basic_regex<char>; using wregex = basic_regex<wchar_t>; using csub_match = sub_match<constchar*>; using wcsub_match = sub_match<constwchar_t*>;
using ssub_match = sub_match<string::const_iterator>; using wssub_match = sub_match<wstring::const_iterator>; using cmatch = match_results<constchar*>; using wcmatch = match_results<constwchar_t*>; using smatch = match_results<string::const_iterator>; using wsmatch = match_results<wstring::const_iterator>;
using cregex_iterator = regex_iterator<constchar*>; using wcregex_iterator = regex_iterator<constwchar_t*>; using sregex_iterator = regex_iterator<string::const_iterator>; using wsregex_iterator = regex_iterator<wstring::const_iterator>;
using cregex_token_iterator = regex_token_iterator<constchar*>; using wcregex_token_iterator = regex_token_iterator<constwchar_t*>; using sregex_token_iterator = regex_token_iterator<string::const_iterator>; using wsregex_token_iterator = regex_token_iterator<wstring::const_iterator>;
cout << "Type of get<1>(t1) = " << typeid(get<1>(t1)).name() << endl; // Outputs: Type of get<1>(t1) = class std::basic_string<char, struct std::char_traits<char>, class std::allocator<char>>
voidprocessPath(const path& p){ if (!exists(p)) return;
auto begin = recursive_directory_iterator(p); auto end = recursive_directory_iterator(); for (auto iter = begin; iter != end; ++ iter) { const string spacer(iter.depth()*2, ' '); auto& entry = *iter;
voidhandleValue(int value){ cout <<"Integer: " << value << endl; } voidhandleValue(double value){ cout << "Double: " << value << endl; } voidhandleValue(string_view value){ cout << value << endl; } voidprocessValues(){ /* Nothing to do in this base case.*/ }
voidprocessValues(){/* Nothing to do in this base case.*/} template<typename T1, typename... Tn> voidprocessValues(T1&& arg1, Tn&&... args){ handleValue(std::forward<T1> (arg1)); processValues(std::forward<Tn>(args)...); }
voidprocessValues(){/* Nothing to do in this base case.*/} template<typename T1, typename... Tn> voidProcessValues(T1 arg1, Tn...args){ handleValue(arg1); processValues(args...); }
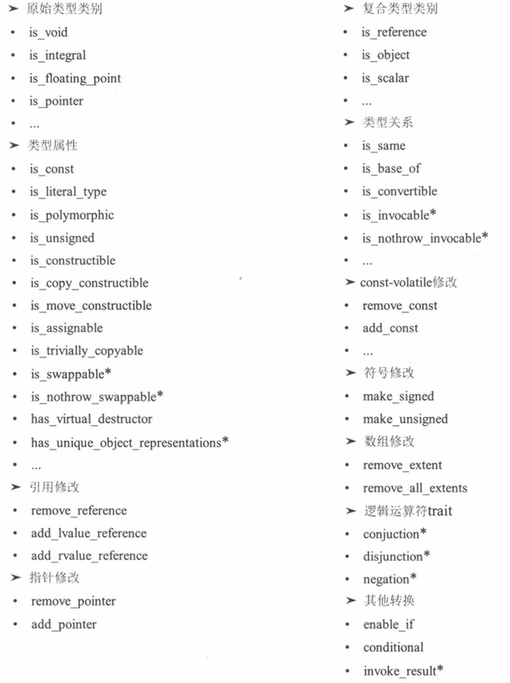
template <classT, T v> structintegral_constant { staticconstexpr T value = v; using value_type = T; using type = integral_constant<T,v>; constexproperatorvalue_type()constnoexcept{ return value; } constexpr value_type operator()()constnoexcept{ return value; } };
这也定义了bool_constant、true_type和false_type类型别名:
1 2 3 4
template <bool B> using bool_constant = integral_constant<bool,B>; using true_type = bool_constant<true>; using false_type = bool_constant<false>;
if (is_integral<int>::value) cout <<"int is integral" << endl; else cout << "int is not integral" << endl; if (is_class<string>::value) cout << "string is a class" << endl; else cout << "string is not a class" << endl;
if (is_integral_v<int>) cout <<"int is integral" << endl; else cout <<"int is not integral" << endl; if(is_class_v<string>) cout <<"string is a class"<< endl; else cout <<"string is not a class" <<endl;
Counter 2 has value 0 Counter 1 has value 0 Counter 1 has value 1 Counter 1 has value 2 Counter 1 has value 3 Counter 1 has value 4 Counter 1 has value 5 Counter 2 has value 1 Counter 2 has value 2 Counter 2 has value 3
Class Counter { public: Counter(int id, int numIterations) : mId(id), mNumIterations(numIterations) { } voidoperator()()const{ for (int i = 0; i < mNumIterations; ++i) cout << "Counter" << mId << " has value " << i << endl; } private: int mId; int mNumIterations; };
intmain(){ int id = 1; int numIterations = 5; thread t1([id, numIterations] { for (int i = 0; i < numIterations; ++i) { cout << "Counter" << id << " has value " << i << endl; } }); t1.join();
voiddoSomeWork(){ for (int i = 0; i < 5; ++ i) cout << i << endl; cout << "Thread throwing a runtime_error exception..."<<endl; throwruntime_error("Exception from thread"); }
// Lock mutex and add entry to the queue. unique_lock lock(mMutex); mQueue.push (entry); // Notify condition variable to wake up thread. mCondVar.notify_all();
voidDoWork(promise<int> thePromise){ thePromise.set_value(42); } intmain(){ promise<int> myPromise; // Get the future of the promise. auto theFuture = myPromise.get_future(); // Create a thread and move the promise into it. thread theThread{ DoWork, std::move(myPromise) };
// Get the result, int result = theFuture.get(); cout << "Result: " << result << endl; // Make sure to join the thread, theThread.join(); }
intCalculateSum(int a, int b){ return a+b; } intmain(){ // Create a packaged task to run CalculateSum. packaged_task<int(int, int)> task(CalculateSum); // Get the future for the result of the packaged task. auto theFuture = task.get_future(): // Create a thread, move the packaged task into it, and // execute the packaged task with the given arguments. thread theThread{ std::move(task), 39, 3}; // Do some more work... int result = theFuture.get(); cout << result << endl; // Make sure to join the thread. theThread.join(); }
intmain(){ auto myFuture = async (calculate); //auto myFuture = async (launch::async, calculate); //auto myFuture = async(launch: :deferred, calculate); // Do some more work.. // Get the result. int result = myFuture.get(); cout << result << endl; }
intcalculate(){ throwruntime_error("Exception thrown from calculate()."); } intmain(){ // Use the launch::async policy to force asynchronous execution. auto myFuture = async (launch::async, calculate); // Get the result. try { int result = myFuture.get(); cout << result << endl; } catch (const exception& ex) { cout << "Caught exception: " << ex.what() << endl; } }
auto signalFutrue = signalPromise.get_future().share(); //shared_future<int> signalFuture (signalPromise.get_future());
auto function1 = [&thread1started, signalFuture] { threadistarted.set_value(); // Wait until parameter is set int parameter = signalFuture.get(); };
auto function2 = [&thread2Started, signalFuture] { thread2started.set_value(); // Wait until parameter is set. int parameter = signalFuture.get(); };
// Run both lambda expressions asynchronously. // Remember to capture the future returned by async()! auto result1 = async (launch::async, function1); auto result2 = async (launch::async, function2);
// Wait until both threads have started. thread1started.get_future().wait(); thread2started.get_future().wait(); // Both threads are now waiting for the parameter. // Set the parameter to wake up both of them. signalPromise.set_value(42);
template <typename T> classObjectPool { public: ObjectPool() = default; virtual ~ObjectPool() = default; // Prevent assignment and pass-by-value ObjectPool(const ObjectPool<T>& src) = delete; ObjectPool<T>& operator=(const ObjectPool<T>& rhs) = delete; // The type of smart pointer returned by acquireObject(). using Object = std::shared_ptr<T>; // Reserves and returns an object for use. Object acquireObject(); private: // stores the objects that are not currently in use by clients. std::queue<std::unique_ptr<T>> mFreeList; };
ObjectPool<ExpensiveObject>::Object getExpensiveObject(ObjectPool<ExpensiveObject>& pool){ // Obtain an ExpensiveObject object from the pool. auto object = pool.acquireObject(); // Populate the object. (not shown) return object; }
voidprocessExpensiveObject(ObjectPool <Expensiveobject>::Object& object){ // Process the object. (not shown) }
intmain(){ ObjectPool<ExpensiveObject> requestPool; { vector<ObjectPool<ExpensiveObject>::Object> objects; for(size_t i = 0; i < 10; ++ i) objects.push_back (getExpensiveobject (requestPool)); } for (size_t i = 0; i < 100; ++ i) { auto reg = getExpensiveObject (requestPool); processExpensiveObject (req); } return0; }
RAII(Resource Acquisition Is Initialization,资源获得即初始化)是一个简单却十分强大的概念。它用于在RAII实例离开作用域时自动释放已获取的资源。这是在确定的时间点发生的。基本上,新RAII实例的构造函数获取特定资源的所有权,并使用资源初始化实例,因此得名RAII。在销毁RAII实例时,析构函数自动释放所获取的资源。下面的RAII类File安全地包装C风格的文件句柄(std::FILE),并在RAII实例离开作用域时自动关闭文件。RAII类也提供get()、release()和reset()方法,这些方法的行为类似于标准库类(如std::unique_ptr)中的同名方法。
本手册是 Agner Fog 优化手册系列第一册 “Optimizing software in C++:An optimization guide for Windows,Linux adn Mac.” 的中文翻译。可以从www.agner.org/optimize/上获取该手册英文版的最新版本。当前中文版是基于2018.9.5日更新的版本翻译的。版权声明请参考本手册最后一章。
1 简介
本手册适用于那些想要使软件更快的编程人员和软件开发者。本手册假设读者熟练掌握 C++ 编程语言,并了解编译器是如何工作的。至于选择 C++ 作为本手册基础的原因,将在稍后解释.
本手册的内容基于笔者对编译器和微处理器是如何工作的研究。本手册中的建议是针对 x86 家族的微处理器,包括 Intel、AMD 和 VIA 的处理器(包括 64 位版本)。x86 处理器是 Widows,Linux, BSD 和 Mac OS X 中最常用的平台,即使这些操作系统也适用于其他微处理器,当然很多设备也使用其他平台和变异语言。
本手册是一个系列五本手册中的第一本:
Optimizing software in C++:An optimization guide for Windows,Linux adn Mac.
Optimizing subroutines in assembly languague:An optimization guide for x86 platforms.
The microarchitecture of Intel,AMD and VIA CPUs:An optimization guide for assembly programmers and compiler makers.
Instruction tables:Lists of instruction latencies,throughputs and micro-operation breakdowns for Intel, AMD and VIA CPUs.
Calling conventions for dirrerent C++ compilers and operating systems.
现如今,对于确定任务的硬件平台的选择通常是由诸如价格、兼容性、第二选择(sencond source)和可用的好的开发工具等因素而不是处理能力决定的。在一个网路中连接几个标准 PC 可能比投资一个大型主机更便宜、更有效率。具有大规模并行向量处理能力的大型超级计算机在科学计算中占有一席之地,但是对于大多数目的来说,标准 PC 处理器还是首选,因为它们具有更高的性价比。
从技术角度来看,标准 PC 处理器的的 CISC 指令集(也称为 x86)不是最佳的。这个指令集还在维护,是为了兼容那些在 70 年代产生的软件,而当时 RAM 和硬盘空间是非常稀缺的资源。然而,CISC 指令集实际上要比它的名声要好。紧凑的代码使得缓存的效率在缓存资源依旧非常有限的今天更加高效。CISC 指令集实际上在缓存资源非常有限的时候表现的比 RISC 指令集更好。x86 指令集最糟糕的问题是寄存器的缺乏。这个问题在 x86 指令集的 64 位扩展中得到了缓解,其中的寄存器数量翻了一倍。
小型手持设备正变得越来越受欢迎,并被用于越来越多的用途,如电子邮件、浏览网页,这些在以前都需要使用一台 PC。类似的,我们正看到有越来越多的设备和机器采用嵌入式处理器。我对使用哪些平台和操作系统更高效,没有任具体的建议。但我们需要认识到这些设备通常情况下,内存和计算能力都是要弱于 PC 的,这非常重要。因此在这样的系统上节约使用资源比在 PC 平台上更加重要。然而,通过良好的软件设计,即使在这样的小型设备上,许多应用程序也可以具有良好的表现,这些将在第17章进行讨论。
本手册基于标准的 PC 平台,采用 Intel、AMD 或者 VIA 处理器,使用 Windows、Linux、BSD 或者 MAC 操作系统。这里给出的很多建议也适用于其它平台,但是都只在 PC 平台上通过测试。
使用中间代码的目的是为了独立于平台且紧凑。使用中间代码的最大缺点是:为了解释或者编译中间代码,用户必须安装庞大的runtime framework。而这个framework 通常需要使用比代码本身多的多的资源。中间代码的另一个缺点是:它增加了额外的抽象层,这使得一些具体的优化更加困难。另一方面,即时编译器可以针对它所运行的 CPU 进行专门的优化,而在预编译代码中进行针对 CPU 的优化更加复杂。
如果分析显示在某个特定应用程序中函数库占用了大量 CPU 时间,或者如果这是显而易见的,那么可以通过使用不同的函数库来显著的提高性能。如果应用程序在库函数中花费了大部分时间,那么除了寻找最有效的库和节省库函数调用之外,可能不需要优化其他任何地方。建议尝试不同的库,看看哪个最好。
下面将讨论一些常见的函数库。还有许多用于特殊目的的库。
Microsoft
微软编译器自带。有些函数优化得很好,有些则没有。支持 32位和 64位 Windows。
Borland / CodeGear / Embarcadero
Borland C++ builder自带。未针对SSE2 和后续指令集进行优化。只支持32位 Windows。
Gnu
Gnu 编译器自带。没有像编译器本身优化的好。64位版本比 32位版本好。Gnu 编译器经常插入内置代码,而不是最常见的内存和字符串指令。内置代码不是最优的。使用选项-fno-builtin 可以迫使编译器使用库版本来替代内置版本。Gnu 库支持 32位和 64位Linux 和BSD。当前的Windows 可使用版本还不是最新的。
Mac
Mac OS X (Darwin)上 Gnu 编译器中包含的库是 Xnu 项目的一部分。在所谓的 commpage 中,操作系统内核中包含了一些最重要的函数。这些功能针对Intel Core 和稍后的Intel 处理器版本进行了高度优化。AMD 处理器和早期的英特尔处理器根本不被支持。只能在 Mac 平台上运行。
Intel
Intel 编译器包含标准函数库。还有一些特殊用途的库,如“Intel Math Kernel Library”和 “ntegrated Performance Primitives”。这些函数库针对大型数据集进行了高度优化。然而,英特尔的库在 AMD 和 VIA 处理器上并不能总是运行良好。有关解释和可能的解决方法,请参见后面的章节。支持所有 x86 和 x86-64 平台。
AMD
AMD Math core library 包含优化过的数学函数。它也适用于英特尔处理器。性能不如Intel库。支持 32位和 64位Windows和Linux。
AsmLib
我自己的函数库是,是为了演示而创建的。可以从www.agner.org/optimize/asmlib.zip获得。目前包括内存和字符串函数的优化版本,以及其他一些很难在其他地方找到的函数。在最新的处理器上运行时,比大多数其他库都要快。支持所有 x86 和 x86-64 平台。
Microsoft Foundation Classes 是一个流行的 WindowsC++ 用户界面库(MFC)。与之竞争的产品是 Borland 现已停止继续维护的Object Windows Library(OWL)。Linux 系统有几个可用的图形界面框架。用户界面库可以作为运行时 DLL 或静态库链接。除非多个应用程序同时使用同一个 DLL,运行时DLL 比静态库占用更多的内存资源。
虽然 C++ 在优化方面有很多优点,但它也有一些缺点,这使得开发人员不得不选择其他编程语言。本节将讨论在选择C++ 进行优化时如何克服这些缺点。
可移植性
C++ 是完全可移植的,因为它的语法在所有主要平台上都是完全标准化和受支持的。然而,C++ 也是一种允许直接访问硬件接口和系统调用的语言。这些当然是系统特有的。为了方便在平台之间进行移植,建议将用户界面代码和其他系统特定部分放在一个单独的模块中,并将代码的任务特定部分(应该是与系统无关的)放在另一个模块中。
整数的大小和其他硬件相关细节取决于硬件平台和操作系统。详情见 7.2 整型变量和运算符。
开发时间
一些开发人员认为特定的编程语言和开发工具比其他语言和开发工具使用起来更快。虽然有些区别仅仅是习惯的问题,但确实有些开发工具具有强大的功能,可以自动完成许多琐碎的编程工作。通过一致的模块化和可重用类,可以降低 C++ 项目的开发时间并提高可维护性。
安全性
C++ 语言最严重的问题与安全性有关。标准C++ 的实现没有检查数组边界违规和无效指针。这是C++ 程序中常见的错误来源,也是黑客可能的攻击点。有必要遵守某些编程原则,以防止在涉及安全性的程序中出现此类错误。
在本手册中,我使用 CPU 时钟周期而不是秒或微秒来作为时间度量单位。这是因为不同计算机有不同的速度。今天,如果我写下的某个任务需要 10μs,那么在下一代的电脑,它可能只需要 5μs,而我的手册将很快被淘汰。但是如果我写下某事需要 10个时钟周期,即使 CPU 时钟频率加倍,那么它仍然需要 10个时钟周期。
时钟周期的长度是时钟频率的倒数。例如,如果时钟频率是 2GHz,那么时钟周期的长度是:
1 2 3
$$ \frac {1} {2GHz}=5ns $$
一台计算机上的时钟周期并不总是可以与另一台计算机上的时钟周期相比较。奔腾4 (NetBurst) CPU 的被设计为具有比其他 CPU 更高的时钟频率,但是总的来说,在执行同一段代码时,它比其他 CPU 耗费更多的时钟周期。
基于事件的采样:分析器告诉 CPU 在某些事件上生成中断,例如每发生1000次缓存不命中。这使得查看程序的哪个部分有最多的缓存丢失、分支错误预测、浮点异常等等成为可能。基于事件的采样需要基于 CPU 的分析器。对于Intel CPU 使用Intel VTune,对于 AMD CPU 使用AMD CodeAnalyst。
如果时间间隔很短,时间测量可能需要很高的分辨率。在 Windows 中,你可以使用 GetTickCount 或 QueryPerformanceCounter 函数获得毫秒级的分辨率。使用 CPU 中的时间戳计数器可以获得更高的分辨率,它以 CPU 时钟频率计数(在 Windows 中: __rdtsc())。
如果线程在不同的 CPU 内核之间跳转,时间戳计数器将会失效。在时间度量期间,你可能必须将线程固定到特定的CPU核心,以避免这种情况。(在Windows 中是SetThreadAffinityMask,在Linux 中是sched_setaffness)。
在 Windows 中访问系统数据库可能需要几秒钟时间。与 Windows 系统中的大型注册数据库相比,将特定于应用程序的信息存储在单独的文件中更有效。注意,如果使用 GetPrivateProfileString和WritePrivateProfileString 等函数读写配置文件(*.ini 文件),系统可能会将信息存储在数据库中。
3.9 其他数据库
许多软件应用程序使用数据库来存储用户数据。数据库会消耗大量的 CPU 时间、RAM 和磁盘空间。在简单的情况下,可以用普通的旧数据文件替换数据库。数据库查询通常可以通过使用索引、使用集合而不是循环等方式进行优化。优化数据库查询超出了本手册的范围,但是你应该知道,优化数据库访问通常可以获得很多好处。
3.10 图形
图形用户界面可能使用大量的计算资源。通常会使用特定的图形框架。操作系统可以在其 API 中提供这样的框架。在某些情况下,在操作系统 API 和应用程序软件之间有一个额外的第三方图形框架层。这样一个额外的框架会消耗大量额外的资源。
应用软件中的每个图形操作都通过调用图形库或 API 函数的函数调用实现的,然后这些函数调用设备驱动程序。对图形函数的调用非常耗时,因为它可能经过多个层,并且需要切换到受保护模式并再次返回。显然,对绘制整个多边形或位图的图形函数进行一次调用要比通过多次函数调用分别绘制每个像素或线条更有效率。
兼容性问题。所有软件都应该在不同的平台、不同的屏幕分辨率、不同的系统颜色设置和不同的用户访问权限上进行测试。软件应该使用标准的 API 调用,而不是自定义的修改和直接访问硬件。应该使用现成的协议和标准化的文件格式。Web 系统应该在不同的浏览器、不同的平台、不同的屏幕分辨率等环境中进行测试。应遵守可访问性指南。
要优化 CPU 密集型软件,首先要找到最佳算法。算法的选择对于排序、搜索和数学计算等任务非常重要。在这种情况下,选择最好的算法比优化想到的第一个算法,你可以得到更多的提升。在某些情况下,你可能需要测试几种不同的算法,以便找到在一组典型测试数据上最有效的算法。
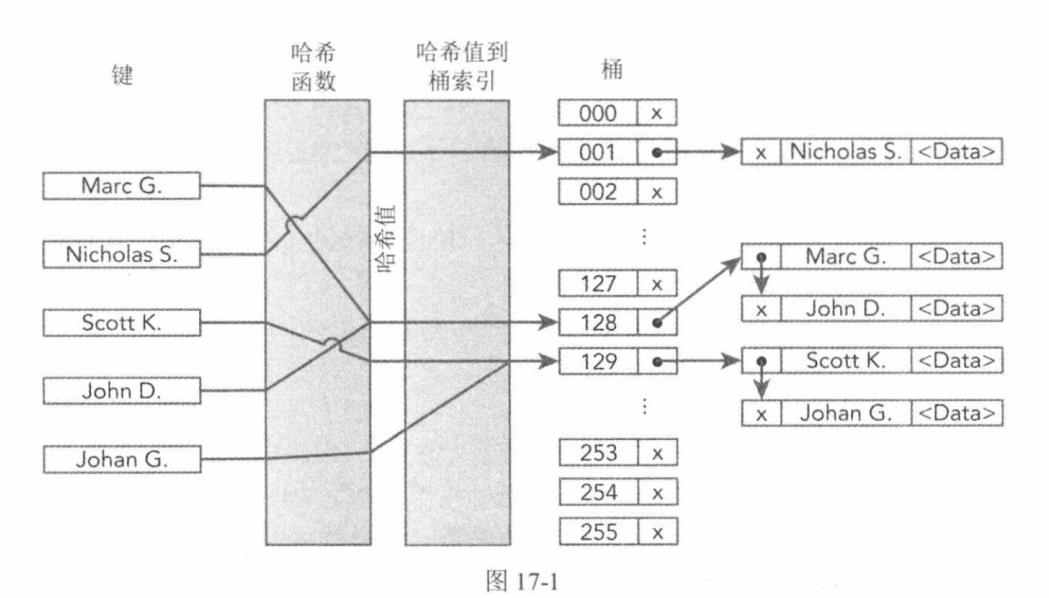
话虽如此,我必须提醒凡事不要过度。如果一个简单的算法可以足够快地完成这项工作,就不要使用高级和复杂的算法。例如,一些程序员甚至使用哈希表来存储很小的数据列表。对于非常大的数据库,哈希表可以显著地提高搜索时间,但是对于使用二分搜索甚至线性搜索的都可以很快完成的列表,就没有理由使用它。哈希表增加了程序的大小和数据文件的大小。如果瓶颈是文件访问或缓存访问,而不是 CPU 时间,这反而会降低效率。复杂算法的另一个缺点是,它使程序的开发成本更高,而且更容易出错。
volatileint seconds; // incremented every second by another thread voidDelayFiveSeconds() { seconds = 0; while (seconds < 5) { // do nothing while seconds count to 5 } }
template <typename T, unsignedint N> classSafeArray { protected: T a[N]; // Array with N elements of type T39 public: SafeArray() { // Constructor memset(a, 0, sizeof(a)); // Initialize to zero } intSize() { // Return the size of the array return N; } T & operator[] (unsignedint i) { // Safe [] array index operator if (i >= N) { // Index out of range. The next line provokes an error. // You may insert any other error reporting here: return *(T*)0; // Return a null reference to provoke error } // No error return a[i]; // Return reference to a[i] } };
使用上述模板类的数组是通过将类型和大小指定为模板参数来声明的,如下面的例7.15b所示。可以使用方括号索引访问它,就像普通数组一样。构造函数将所有元素设置为零。如果你不希望这个初始化,或者类型 T 是一个具有默认构造函数的类,它会执行必要的初始化,那么可以删除 memset 这一行。编译器可能会报告 memset 已被弃用。这是因为如果参数 size 错误,它会导致错误,但它仍然是将数组设置为 0 的最快方法。如果索引超出范围,[] 运算符将检测到错误(参见14.2 边界检查)。在这里,通过返回空引用这一非常规的方式引发错误消息。如果数组元素被访问,这将在受保护的操作系统中引发错误消息,并且这个错误很容易通过调试器跟踪。你可以用任何其他形式的错误报告来替换这一行。例如,在Windows 中,你可以这么写:FatalAppExitA(0,"Array index out of range");,更好方法的是创建自己的错误消息函数。
下面的例子演示了如何使用SafeArray:
1 2 3 4 5 6 7 8
// Example 7.15b
SafeArray <float, 100> list; // Make array of 100 floats for (int i = 0; i < list.Size(); i++) { // Loop through array cout << list[i] << endl; // Output array element }
int i; float f; f = i; // Implicit type conversion f = (float)i; // C-style type casting f = float(i); // Constructor-style type casting f = static_cast<float>(i); // C++ casting operator
float x; *(int*)&x |= 0x80000000; // Set sign bit of x
这里的语法可能看起来有点奇怪。将 x 的地址类型转换为指向整数的指针,然后对该指针取值,以便将 x 作为整数访问。编译器不会生成任何额外的代码来实际创建指针。指针被简单地优化掉了,结果是 x 被当作一个整数。但是,运算符强制编译器将 x 存储在内存中,而不是寄存器中。上面的示例使用 | 运算符设置 x 的符号位,只能应用于整数。这样操作比 x = -abs(x) 更快。
在类型转换指针时,有许多危险的地方需要注意:
这个技巧违反了标准 C 的严格的别名规则,规定不同类型的两个指针不能指向相同的对象( char 指针除外)。优化编译器可以将浮点数和整数表示形式存储在两个不同的寄存器中。你需要检查编译器是否按照你希望的方式运行。使用 union 会更安全,如14.9 用整数操作来改变浮点型变量中例 14.23所示。
如果将对象视为比实际更大的对象,这个技巧就会失效。如果 int 比 float 使用更多的位,上面的代码将会失败。(两者在 x86系统中都使用 32个位)。
如果你以部分访问的方式访问变量,例如,如果你一次操作 64位 double 类型的32位,那么由于 CPU 中的存储转发延迟,代码的执行速度可能会低于预期(参见手册3:“The microarchitecture of Intel, AMD and VIA CPUs”)。
const_cast
const_cast 运算符用于解除 const 对指针的限制。它有一些语法检查,因此比 C 风格的类型转换更加安全,而无需添加任何额外的代码。例如:
1 2 3 4 5 6 7 8 9 10 11 12 13
// Example 7.28
classc1 { constint x; // constant data public: c1() : x(0) {}; // constructor initializes x to 0 voidxplus2() { // this function can modify x *const_cast<int*>(&x) += 2; } // add 2 to x };
这里 const_cast 运算符的作用是消除 x 上的 const 限制,这是一种解除语法限制的方法,但它不会生成任何额外的代码,也不会花费任何额外的时间。这是确保一个函数可以修改 x,而其他函数不能修改 x 的有用方法。
static_cast
static_cast 运算符的作用与 C 风格的类型转换相同。例如,它用于将 float 转换为 int。
reinterpret_cast
reinterpret_cast 运算符用于指针转换。它的作用与 C 风格类型转换相同,只是多了一点语法检查。它不产生任何额外的代码。
微处理器设计者已经竭尽全力减少这个问题的发生。其中最重要的方法是分支预测。现代微处理器使用先进的算法,根据该分支和附近其他分支的过去历史来预测分支的发展方向。对于不同类型的微处理器,用于分支预测的算法是不同的。这些算法在手册3“The microarchitecture of Intel, AMD and VIA CPUs”中有详细的描述。
for 循环或 while 循环也是一种分支。在每次迭代之后,它决定是重复还是退出循环。如果重复计数很小且始终相同,则通常可以很好地预测循环分支。根据处理器的不同,可以完美预测的最大循环数在 9 到 64 之间变化。嵌套循环只能在某些处理器上得到很好的预测。在许多处理器上,包含多个分支的循环并不能很好地被预测。
switch 语句也是一种分支,它可以有两个以上的分支。如果 case 标签是遵循每个标签等于前一个标签加 1 的序列,在这个时候 switch语句的效率是最高的,因为它可以被实现为一个目标跳转表。如果 switch 语带有许多标签值,并且彼此相差较大,这将是低效的,因为编译器必须将其转换成一个分支树。
手册3:“The microarchitecture of Intel, AMD and VIA CPUs”提供了不同微处理器中分支预测的更多细节。
7.13 循环
循环的效率取决于微处理器对循环控制分支的预测能力。有关分支预测的说明,请参阅前文和手册3:“The microarchitecture of Intel, AMD and VIA CPUs”。一个具有一个较小并且固定的重复计数,没有分支的循环,可以完美地被预测。如上所述,可以预测的最大循环数取决于处理器。只有在某些具有特殊循环预测器的处理器上,嵌套循环才能被很好地预测。在其他处理器上,只能很好地预测最内层的循环。只有在循环退出时,才会错误地预测具有高重复计数的循环。例如,如果一个循环重复 1000次,那么循环控制分支在 1000次中只会出现一次错误预测,因此错误预测的惩罚对总执行时间的影响可以忽略不计。
循环展开
在某些情况下,展开循环可能有很多好处。例如:
1 2 3 4 5 6 7 8 9 10 11 12 13 14 15
// Example 7.30a
int i; for (i = 0; i < 20; i++) { if (i % 2 == 0) { FuncA(i); } else { FuncB(i); } FuncC(i); }
将整数与零进行比较有时比将其与任何其他数字进行比较的效率更高。因此,将循环计数减少到 0 比将其增加到某个正值 n 要稍微快一些。但如果循环计数器用作数组索引,则不是这样。数据缓存是为向前而不是向后访问数组而优化的。
复制或清除数组
对于诸如复制数组或将数组中的元素全部设置为零这样的琐碎任务,使用循环可能不是最佳选择。例如:
1 2 3 4 5 6 7 8 9 10
// Example 7.33a
constint size = 1000; int i; float a[size], b[size]; // set a to zero for (i = 0; i < size; i++) a[i] = 0.0; // copy a to b for (i = 0; i < size; i++) b[i] = a[i];
使用memset和memcpy函数通常会更快:
1 2 3 4 5 6 7 8
// Example 7.33b
constint size = 1000; float a[size], b[size]; // set a to zero memset(a, 0, sizeof(a)); // copy a to b memcpy(b, a, sizeof(b));
在 32位系统中,简单的函数参数在栈上传递,但在 64位系统,使用寄存器中传递。后者效率更高。64位Windows 允许在寄存器中传输最多4个参数。64位Unix 系统允许在寄存器中传输最多14个参数( 8个浮点数或双精度数加上 6个整数、指针或引用参数)。成员函数中的 this 指针占用一个参数。手册5:“Calling conventions for different C++ compilers and operating systems”给出了更多的细节。
递归函数是一个调用自身的函数。函数递归调用对于处理递归数据结构非常有用。递归函数的代价是所有参数和局部变量在每次递归时都会有一个新实例,这会占用栈空间。深度递归还会降低返回地址的预测效率。这个问题通常出现在递归深度超过 16 的情况下(参见手册3“The microarchitecture of Intel, AMD and VIA CPUs”中对返回栈缓冲区的解释)。
structS1 { shortint a; // 2 bytes. first byte at 0, last byte at 1 // 6 unused bytes double b; // 8 bytes. first byte at 8, last byte at 15 int d; // 4 bytes. first byte at 16, last byte at 19 // 4 unused bytes }; S1 ArrayOfStructures[100];
这里,a 和 b 之间有 6 个未使用的字节,因为 b 必须从一个能被 8 整除的地址开始。最后还有 4 个未使用的字节。由于数组中 S1 的下一个实例必须从一个可被 8 整除的地址开始,这样做,方便将其中的 b成员与 8 对齐。通过将最小的成员放在最后,可以将未使用的字节数减少到 2:
1 2 3 4 5 6 7 8 9 10
// Example 7.39b
structS1 { double b; // 8 bytes. first byte at 0, last byte at 7 int d; // 4 bytes. first byte at 8, last byte at 11 shortint a; // 2 bytes. first byte at 12, last byte at 13 // 2 unused bytes }; S1 ArrayOfStructures[100];
classS2 { public: int a[100]; // 400 bytes. first byte at 0, last byte at 399 int b; // 4 bytes. first byte at 400, last byte at 403 intReadB(){return b;} };
b的偏移量是 400。任何通过指针或成员函数(如 ReadB)访问 b 的代码都需要将偏移量编码为 32位数字。如果交换了 a 和 b,那么可以使用一个被编码为 8位有符号数字的偏移量来访问它们,或者完全不使用偏移量。这使得代码更紧凑,从而更有效地使用代码缓存。因此,建议在结构或类声明中,大数组和其他大对象放在最后,最常用的数据成员放在前面。如果不可能在前 128 个字节中包含所有数据成员,则将最常用的成员放在前 128个字节中。
classvector { // 2-dimensional vector public: float x, y; // x,y coordinates vector() {} // default constructor vector(float a, float b) { x = a; y = b; } // constructor vector operator + (vector const & a) { // sum operator returnvector(x + a.x, y + a.y); } // add elements }; vector a, b, c, d; a = b + c + d; // makes intermediate object for (b + c)
在上面的例子中,模板函数比简单函数快,因为编译器知道它可以通过移位操作来实现乘以 2 的幂。x*8被 x<<3所代替,速度更快。在简单函数的情况下,编译器不知道 m 的值,因此不能进行优化,除非函数可以内联。(在上面的例子中,编译器能够内联和优化这两个函数,并简单地将 80 存入 a 和 b 中。但在更复杂的情况下,编译器可能无法做到这一点)。
// Example 7.47b. Compile-time polymorphism with templates
// Place non-polymorphic functions in the grandparent class: classCGrandParent { public: voidNotPolymorphic(); }; // Any function that needs to call a polymorphic function goes in the // parent class. The child class is given as a template parameter: template <typename MyChild> classCParent : public CGrandParent { public: voidHello() { cout << "Hello "; // call polymorphic child function: (static_cast<MyChild*>(this))->Disp(); } }; // The child classes implement the functions that have multiple // versions: classCChild1 : public CParent<CChild1> { public: voidDisp() { cout << 1; } }; classCChild2 : public CParent<CChild2> { public: voidDisp() { cout << 2; } }; voidtest() { CChild1 Object1; CChild2 Object2; CChild1 * p1; p1 = &Object1; p1->Hello(); // Writes "Hello 1" CChild2 * p2; p2 = &Object2; p2->Hello(); // Writes "Hello 2" }
在这里 CParent 是一个模板类,它通过模板参数获取关于其子类的信息。它可以通过将它的 this 指针类型转换为指向它的子类的指针来调用它的子类的多态成员。只有将正确的子类名作为模板参数时,这才是安全的。换句话说,你必须确保子类的声明 class CChild1 : public CParent<CChild1> { 和模板参数具有相同的名称。
异常处理旨在检测很少发生的错误,并以一种优雅的方式从错误条件中恢复。你可能认为只要没有发生错误,异常处理就不需要额外的时间,但不幸的是,这并不总是正确的。为了知道如何在异常事件中恢复,程序可能需要做大量的记录工作。这种记录的消耗在很大程度上取决于编译器。有些编译器具有高效的基于表的方法,开销很少或没有,而其他编译器则具有低效的基于代码的方法,或者需要运行时类型识别(RTTI ),这会影响代码的其他部分。更详细的信息请参阅 ISO/IEC TR18015 Technical Report on C++ Performance 。
函数 F1 在返回时应该调用对象 x 的析构函数。但是如果 F1 中的某个地方发生异常怎么办?然后我们跳出 F1 而不返回。F1 的清理工作被阻止了,因为它被中断了。现在,异常处理程序负责调用 x 的析构函数,这只有在 F1 保存了要调用的析构函数的所有信息或可能需要的任何其他清理信息时才有可能。如果 F1 调用另一个函数进而调用另一个函数,等等,如果在最里面的函数产生了一个异常,然后异常处理程序需要关于函数调用链和需要遵循的函数调用的顺序等所有信息,来检查所有必要的清理工作。这叫做堆栈展开。
这允许编译器假设 F1 永远不会抛出任何异常,这样它就不必为函数 F1 保存恢复信息。但是,如果 F1 调用另一个可能抛出异常的函数 F2,那么 F1 必须检查 F2 抛出的异常,并在 F2 实际抛出异常时调用 std::unexpected() 函数。因此,只有当 F1 调用的所有函数也有一个 throw() 声明时才可以对 F1 使用 throw() 声明。throw() 声明对于库函数很有用。
// Portability note: This example is specific to Microsoft compilers. // It will look different in other compilers. #include<excpt.h> #include<float.h> #include<math.h> #define EXCEPTION_FLT_OVERFLOW 0xC0000091L
voidMathLoop() { constint arraysize = 1000; unsignedint dummy; double a[arraysize], b[arraysize], c[arraysize]; // Enable exception for floating point overflow: _controlfp_s(&dummy, 0, _EM_OVERFLOW); //_controlfp(0, _EM_OVERFLOW); // if above line doesn't work int i = 0; // Initialize loop counter outside both loops // The purpose of the while loop is to resume after exceptions: while (i < arraysize) { // Catch exceptions in this block: __try { // Main loop for calculations: for ( ; i < arraysize; i++) { // Overflow may occur in multiplication here: a[i] = log (b[i] * c[i]); } } // Catch floating point overflow but no other exceptions: __except (GetExceptionCode() == EXCEPTION_FLT_OVERFLOW ? EXCEPTION_EXECUTE_HANDLER : EXCEPTION_CONTINUE_SEARCH) { // Floating point overflow has occurred. // Reset floating point status: _fpreset(); _controlfp_s(&dummy, 0, _EM_OVERFLOW); // _controlfp(0, _EM_OVERFLOW); // if above doesn't work // Re-do the calculation in a way that avoids overflow: a[i] = log(b[i]) + log(c[i]); // Increment loop counter and go back into the for-loop: i++; } } }
使用 NAN 作为输入的大多数操作将输出 NAN,因此 NAN 将传播到最终结果。这是一种简单有效的浮点错误检测方法。几乎所有以 INF 或 NAN 形式出现的浮点错误都将传播到它们最终结果。如果打印结果,你将看到 INF 或 NAN,而不是数字。跟踪错误不需要额外的代码,INF 和 NAN 的传播也不需要额外的成本。
NAN 可以包含带有额外信息的负载(payload)。函数库可以在出现错误时将错误代码放入此负载中,此负载将传播到最终的结果。
当参数为 INF 或 NAN 时,函数 finite() 将返回 false,如果它是一个普通的浮点数,则返回 true。这可用于在浮点数转换为整数之前检测错误,以及在其他需要检查错误的情况下。
int i, a[100], b; for (i = 0; i < 100; i++) { a[i] = b * b + 1; }
可能会被编译器改成这样:
1 2 3 4 5 6 7 8
// Example 8.13b
int i, a[100], b, temp; temp = b * b + 1; for (i = 0; i < 100; i++) { a[i] = temp; }
归纳变量(Induction variables)
循环计数器的线性函数表达式可以通过在前一个值上添加一个常数来计算。例如:
1 2 3 4 5 6 7
// Example 8.14a
int i, a[100]; for (i = 0; i < 100; i++) { a[i] = i * 9 + 3; }
编译器可能会将其改成下面的形式以避免乘法:
1 2 3 4 5 6 7 8 9
// Example 8.14b
int i, a[100], temp; temp = 3; for (i = 0; i < 100; i++) { a[i] = temp; temp += 9; }
归纳变量常用于计算数组元素的地址。例如:
1 2 3 4 5 6 7 8 9
// Example 8.15a
structS1 {double a; double b;}; S1 list[100]; int i; for (i = 0; i < 100; i++) { list[i].a = 1.0; list[i].b = 2.0; }
为了访问 list 的元素,编译器必须计算它的地址。list[i] 的地址等于 list 的起始地址加上 i*sizeof(S1)。这是一个关于 i 的线性函数,这是可以通过归纳变量计算的。编译器可以使用相同的归纳变量来访问 list[i].a 和 list[i].b。当可以提前计算归纳变量的最终值时,也可以消去 i,用归纳变量作为循环计数器。这可以将代码简化为:
编译器不需要归纳变量来计算简单类型的数组元素的地址,当地址可以表示为一个基地址加上一个常数加上索引乘以一个系数1,2,4或8(但不是任何其他因数), CPU 中有硬件支持这样的计算。如果在例 8.15a中的 a 和 b 是 float 而不是 double,那么 sizeof(S1) 的值将是 8,那么就不需要归纳变量了,因为 CPU 有硬件可以寄计算 index 乘上 8。
float a, b, c, d, e, f, x, y; x = a + b + c; y = d + e + f;
在这个例子中,编译器可以交错这两个公式,先算 a + b,然后是 d + e,然后将 c 加到第一个和中,之后 f 被加到第二个和中,第一个结果是存储在 x 中,最后第二个结果存储在 y 中。这样做的目的是帮助CPU 同时进行多个计算。现代CPU 实际上可以在没有编译器帮助的情况下对指令进行重新排序(参见11 乱序执行),但是编译器可以使CPU 更容易地对指令进行重新排序。
整数表达式不太容易出现溢出和精度损失的问题,原因见8.1 编译器是如何优化的:代数化简。因此,编译器可以对整数表达式进行比浮点数表达式更多的化简。大多数涉及整数加法、减法和乘法的化简在所有情况下都是被允许的,而许多涉及除法和关系运算符(如“>”)的化简,由于数学的纯粹性是不被允许的。例如,由于存在隐藏的溢出的可能性,编译器不能将整数表达式 -a > -b 化简为 a < b。
// Example 8.23a. Loop to make table of polynomial
constdouble A = 1.1, B = 2.2, C = 3.3; // Polynomial coefficients double Table[100]; // Table int x; // Loop counter for (x = 0; x < 100; x++) { Table[x] = A*x*x + B*x + C; // Calculate polynomial }
这个多项式的计算通过两个归纳变量,只需要两个加法就可以完成:
1 2 3 4 5 6 7 8 9 10 11 12 13 14 15
// Example 8.23b. Calculate polynomial with induction variables
constdouble A = 1.1, B = 2.2, C = 3.3; // Polynomial coefficients double Table[100]; // Table int x; // Loop counter constdouble A2 = A + A; // = 2*A double Y = C; // = A*x*x + B*x + C double Z = A + B; // = Delta Y for (x = 0; x < 100; x++) { Table[x] = Y; // Store result Y += Z; // Update induction variable Y Z += A2; // Update induction variable Z }
例8.23b中的循环中有两个循环依赖链(loop-carried dependency chain),即两个归纳变量 Y 和 Z。每个依赖链都有一个延迟,这个延迟与浮点加法的延迟相同。这个延迟足够小,说明该方法是合适的。一个较长的循环依赖链会使归纳变量方法变得不利,除非该值是从一个两次或多次迭代的值计算出来的。
如果你考虑到每个值都是从序列中位于 r 位置之前的值计算出来的,其中 r 是一个向量中的元素数或循环展开因子,那么归纳变量的方法也可以向量化。要在每种情况下找到正确的公式,需要一点数学知识。
; Example 8.26a compiled to assembly: ALIGN4; align by 4 PUBLIC ?Func@@YAXQAHAAH@Z ; mangled function name ?Func@@YAXQAHAAH@Z PROC NEAR; start of Func ; parameter 1: 8 + esp ; a ; parameter 2: 12 + esp ; r $B1$1: ; unused label pushebx; save ebx on stack movecx, DWORDPTR [esp+8] ; ecx = a xoreax, eax; eax = i = 0 movedx, DWORDPTR [esp+12] ; edx = r $B1$2: ; top of loop movebx, eax; compute i/2 in ebx shrebx, 31; shift down sign bit of i addebx, eax; i + sign(i) sarebx, 1; shift right = divide by 2 addebx, DWORDPTR [edx] ; add what r points to movDWORDPTR[ecx+eax*4],ebx; store result in array addeax, 1; i++ cmpeax, 100; check if i < 100 jl $B1$2; repeat loop if true $B1$3: ; unused label popebx; restore ebx from stack ret; return ALIGN4; align ?Func@@YAXQAHAAH@Z ENDP ; mark end of procedure
编译器生成的大多数注释已经被我的注释(灰色)所取代。阅读和理解编译器生成的汇编代码需要一定的经验。让我详细解释一下上面的代码。看着有点怪异的名字 ?Func@@YAXQAHAAH@Z 是 Func 的名称,其中添加了许多关于函数类型及其参数的信息。这叫做名称重整(name mangling)。汇编的名称允许使用 “?” 、“@”和“$”。有关名称重整的详细信息在手册5:“Calling conventions for different C++ compilers and operating systems”中有解释。参数 a 和 r 在地址为 esp+8 和 esp+12 的栈上传递,并分别加载到 ecx 和 edx 中(在64位模式下,参数将在寄存器中传递,而不是在栈中)。ecx现在包含数组 a 的第一个元素的地址,edx 包含 r 指向的变量的地址。引用和指针在汇编代码中是一样的。寄存器 ebx 在使用之前入栈,在函数返回之前出栈。这是因为寄存器使用约定不允许函数更改ebx 的值。只有寄存器 eax、ecx 和 edx 可以自由更改。循环计数器 i 作为寄存器变量存储在 eax 中。循环初始化条件 i=0,已翻译成指令 xor eax,eax。这是一种将寄存器设置为 0 的常见方法,比 mov eax, 0 更快。循环体从标签 $B1$2 开始。这只是编译器为标签选择的任意名称。它使用 ebx 作为计算 i/2+r 的临时寄存器。指令 mov ebx,eax / shr ebx,31 将 i 的符号位复制到 ebx的最小有效位。接下来的两条指令是 add ebx, eax / sar ebx,1把这个加到i上然后向右移动一个位置以便将i除以2。指令 add ebx, DWORD PTR [edx] 加到 ebx 上的不是 edx,而是地址位为 edx 中值的变量。方括号表示使用 edx 中的值作为内存指针。这是 r 所指向的变量。现在 ebx 包含 i/2+r。下一条指令 mov DWORD PTR [ecx+eax*4],ebx 将这个结果存储在 a[i] 中。注意数组地址的计算是很高效的。ecx 包含数组开头的地址。eax 保存了索引 i,这个索引必须乘以每个数组元素的大小(以字节为单位)才能计算出第 i 个元素的地址,int 的大小是 4。所以数组元素 a[i] 的地址是 ecx+eax*4。结果 ebx 存储在地址 [ecx+eax*4]。这都是在一条指令中完成的。CPU 支持这种指令来快速访问数组元素。指令 add eax,1 是循环增量 i++。cmp eax, 100/ jl $B1$2 是循环条件 i < 100。它将 eax 与 100 进行比较,如果 i < 100,则跳回回 $B1$2 标签。pop ebx 恢复在开始时保存的 ebx 值。ret 从函数返回。
汇编代码清单显示了三个可以进一步优化的地方。我们注意到的第一个地方是它对 i 的符号做了一些怪异的处理,以便将 i 除以2。编译器没有注意到 i 不能是负的,所以我们不需要关心符号位。我们可以通过将 i 声明为无符号整型数或在除以 2 之前将 i 的类型转换为无符号整型数,来告诉编译器这一点(参见14.5 整数除法)。
我们注意到的第二个地方是,r 所指向的值会从内存中重新加载 100次。这是因为我们忘记告诉编译器假设没有指针别名(8.3 编译器优化的障碍:指针别名)。添加编译器选项“assume no pointer aliasing”(如果可用的化)有可能改善代码。
; Example 8.26b compiled to assembly: ALIGN4; align by 4 PUBLIC ?Func@@YAXQAHAAH@Z ; mangled function name ?Func@@YAXQAHAAH@Z PROC NEAR; start of Func ; parameter 1: 4 + esp ; a ; parameter 2: 8 + esp ; r $B1$1: ; unused label moveax, DWORDPTR [esp+4] ; eax = address of a movedx, DWORDPTR [esp+8] ; edx = address in r movecx, DWORDPTR [edx] ; ecx = Induction leaedx, DWORDPTR [eax+400] ; edx = point to end of a $B2$2: ; top of loop movDWORDPTR [eax], ecx; a[i] = Induction; movDWORDPTR [eax+4], ecx; a[i+1] = Induction; addecx, 1; Induction++; addeax, 8; point to a[i+2] cmpedx, eax; compare with end of array ja $B2$2; jump to top of loop $B2$3: ; unused label ret; return from Func ALIGN4 ; mark_end; ?Func2@@YAXQAHAAH@Z ENDP
使用 new 和 delete 分配可变大小的数组的一个鲜为人知的替代方法是使用 alloca 分配来代替。这是一个在栈上而不是堆上分配内存的函数。内存空间在当从调用 alloca 的函数返回时会被自动释放。在使用 alloca 时,不需要显式地释放空间。与 new 和 delete 或 malloc 和 free 相比,alloca 的优势有:
分配过程的开销很小,因为微处理器有硬件支持对栈的操作。
由于堆栈的先入后出特性,内存空间不会变得支离破碎。
重新分配没有成本,因为它在函数返回时将自动执行。不需要垃圾收集。
所分配的内存与栈上的其他对象是连续的,这使得数据缓存非常高效。
下面的例子将展示如何适应alloca分配可变大小的数组:
1 2 3 4 5 6 7 8 9 10 11 12 13 14 15
#include<malloc.h> voidSomeFunction(int n) { if (n > 0) { // Make dynamic array of n floats: float * DynamicArray = (float *)alloca(n * sizeof(float)); // (Some compilers use the name _alloca) for (int i = 0; i < n; i++) { DynamicArray[i] = WhateverFunction(i); // ... } } }
文本字符串通常具有在编译时不知道的可变长度。文本字符串在 string、wstring 或 CString 等类中的存储使用 new 和 delete 来在每次创建或修改字符串时分配一个新的内存块。如果一个程序创建或修改了很多字符串,这可能是非常低效的。
在大多数情况下,处理字符串最快的方法是使用老式 C 风格的字符数组。字符串可以通过 C 函数如 strcpy、strcat、strlen、sprintf 等进行操作。但是要注意,这些函数没有检查数组是否溢出。数组溢出会导致在程序的其他地方出现难以预测的错误,这些错误很难诊断。程序员有责任确保数组足够大,能够处理包括终止符(0)在内的字符串,并在必要时进行溢出检查。在www.agner.org/optimize/asmlib.zip的 asmlib 库中提供了常用字符串函数的快速版本以及用于字符串搜索和解析的高效函数。
// Example 9.5a constint SIZE = 64;// number of rows/columns in matrix voidtranspose(double a[SIZE][SIZE])// function to transpose matrix { // define a macro to swap two array elements: #define swapd(x,y) {temp=x; x=y; y=temp;} int r, c; double temp; for (r = 1; r < SIZE; r++) { // loop through rows for (c = 0; c < r; c++) { // loop columns below diagonal swapd(a[r][c], a[c][r]); // swap elements } } }
voidtest() { __declspec(__align(64)) // align by cache line size double matrix[SIZE][SIZE]; // define matrix transpose(matrix); // call transpose function }
矩阵的转置和以对角线为轴做镜像是一样的。对角线以下的每个元素矩阵 [r][c] 在对角线以上的镜像位置与元素矩阵 [c][r]交换。例 9.5a中的循环 c 从最左边的列到对角线。对角线上的元素保持不变。
voidtranspose(double a[SIZE][SIZE]) { // Define macro to swap two elements: #define swapd(x,y) {temp=x; x=y; y=temp;} // Check if level-2 cache contentions will occur: if (SIZE > 256 && SIZE % 128 == 0) { // Cache contentions expected. Use square blocking: int r1, r2, c1, c2; double temp; // Define size of squares: constint TILESIZE = 8; // SIZE must be divisible by TILESIZE // Loop r1 and c1 for all squares: for (r1 = 0; r1 < SIZE; r1 += TILESIZE) { for (c1 = 0; c1 < r1; c1 += TILESIZE) { // Loop r2 and c2 for elements inside sqaure: for (r2 = r1; r2 < r1+TILESIZE; r2++) { for (c2 = c1; c2 < c1+TILESIZE; c2++) { swapd(a[r2][c2],a[c2][r2]); } } } // At the diagonal there is only half a square. // This triangle is handled separately: for (r2 = r1+1; r2 < r1+TILESIZE; r2++) { for (c2 = r1; c2 < r2; c2++) { swapd(a[r2][c2],a[c2][r2]); } } } } else { // No cache contentions. Use simple method. // This is the code from example 9.5a: int r, c; double temp; for (r = 1; r < SIZE; r++) { // loop through rows for (c = 0; c < r; c++) { // loop columns below diagonal swapd(a[r][c], a[c][r]); // swap elements } } } }
// Example 9.6a constint SIZE = 512; // number of rows and columns in matrix // function to transpose and copy matrix voidTransposeCopy(double a[SIZE][SIZE], double b[SIZE][SIZE]) { int r, c; for (r = 0; r < SIZE; r++) { for (c = 0; c < SIZE; c++) { a[c][r] = b[r][c]; } } }
这个函数逐列写入矩阵 a,而由于关键步长导致所有写入都在一级缓存和二级缓存中都需要加载新的缓存线。使用非时序写指令可以防止二级缓存为矩阵 a 的加载任何缓存线:
// Example 9.6b. #include"xmmintrin.h"// header for intrinsic functions // This function stores a double without loading a cache line: staticinlinevoidStoreNTD(double * dest, doubleconst & source) { _mm_stream_pi((__m64*)dest, *(__m64*)&source); // MOVNTQ _mm_empty(); // EMMS } constint SIZE = 512; // number of rows and columns in matrix // function to transpose and copy matrix voidTransposeCopy(double a[SIZE][SIZE], double b[SIZE][SIZE]) { int r, c; for (r = 0; r < SIZE; r++) { for (c = 0; c < SIZE; c++) { StoreNTD(&a[c][r], b[r][c]); } } }
在奔腾4计算机上测量了不同矩阵大小下每个矩阵单元的执行时间。测量结果如下:
Matrix size
Time per element Example 9.6a
Time per element Example 9.6b
64*64
14.0
80.8
65*65
13.6
80.9
512*512
378.7
168.5
513*513
58.7
168.3
Table 9.3. Time for transposing and copying different size matrices, clock cycles per element.
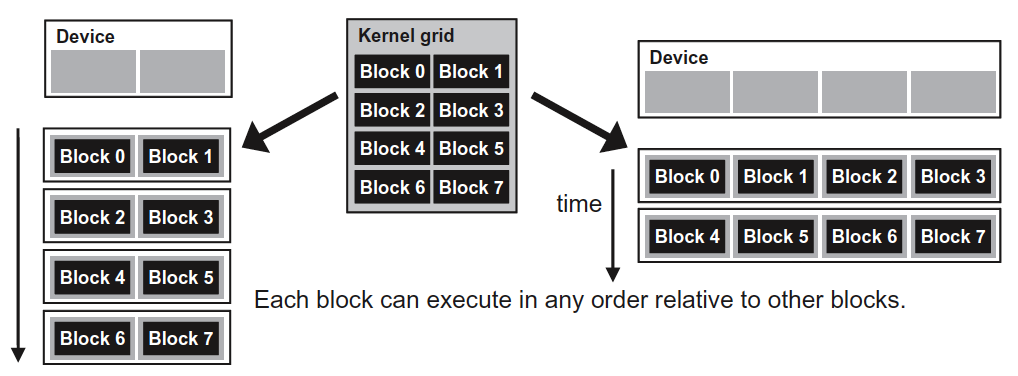
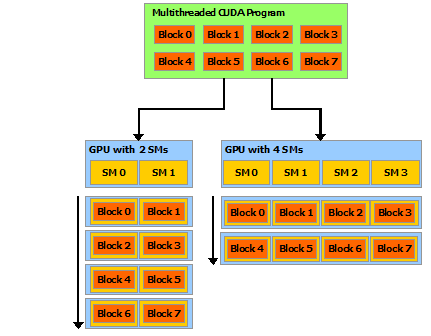
CPU 的时钟频率受到物理因素的限制。在时钟频率有限的情况下,提高 CPU 密集型程序的吞吐量的方法是同时做多个事情。有三种方法可以并行地执行任务:
使用多个 CPU 或 多 核 CPU,如本章所述。
使用现代 CPU 的乱序执行能力,如第11章所述。
使用现代 CPU 的向量操作,如第12章所述。
多数现代 CPU 都拥有两个或更多个核心,可以预期的是,在未来核心的数量还会继续增加。为了使用多个 CPU 或者多个 CPU 核心,我们需要将任务划分到不同的线程。这里有两个主要的方法:功能分解和数据分解。功能分解意味着不同的线程做不同的工作。例如,一个线程处理用户界面,另一个线程处理和远程数据库的通信,第三个线程处理数学计算。将用户界面和耗时任务放在不同的线程中是很重要的,否则响应时间会变的长且不规则,这是很令人讨厌的。将耗时的任务放在低优先级的单独线程中通常是很有帮助的。
通常,乱序执行机制是自动工作的。但是,程序员可以做一些事情来最大限度地利用乱序执行。最重要的是避免过长的依赖链。你可以做的另一件事是混合不同类型的操作,以便在 CPU 中的不同执行单元之间均匀地分配工作。只要不需要在整数和浮点数之间进行转换,就可以混合使用整数和浮点数计算。将浮点加法与浮点乘法混合使用、将简单整数与向量整数操作混合使用、将数学计算与内存访问混合使用也有很大的好处。
过长的依赖链会给 CPU 的乱序执行资源带来了压力,即使它们没有进入循环的下一次迭代。一个现代的 CPU 通常可以处理 100多个待定操作(参见手册3:“The microarchitecture of Intel, AMD and VIA CPUs”)。将循环分割并存储中间结果,对打破一个非常长的依赖链是有帮助的。
为 AVX 指令集编译的代码只有在 CPU 和操作系统都支持 AVX 的情况下才能运行。在 Windows 7 、 Windows Server 2008 R2 和 Linux 内核2.6.30及以上版本中支持 AVX 。 Microsoft 、 Intel 、 Gnu 和 Clang 的最新编译器支持 AVX 指令集。
constint size = 1024; int a[size], b[size]; // ... for (int i = 0; i < size; i++) { a[i] = b[i] + 2; }
一个好的编译器会在指定SSE2 或更高的指令集时使用向量操作来优化这个循环。根据使用指令集的不同,代码将读取4个,或8个,或16个 b 中的元素到一个向量寄存器中,与另一个向量寄存器包含(2,2,2,…)做加法,并将结果存储到 a 中。此操作将被重复多次,次数为数组大小除以每个向量的元素数量。速度相应地提高了。循环计数能最好能被每个向量的元素数整除。你甚至可以在数组的末尾添加多余的元素,使数组大小成为向量大小的倍数。
当数组是通过指针访问的时候,这将会有一个缺点,例如:
1 2 3 4 5 6 7 8 9
// Example 12.1b. Vectorization with alignment problem
voidAddTwo(int * __restrict aa, int * __restrict bb) { for (int i = 0; i < size; i++) { aa[i] = bb[i] + 2; } }
使用适合应用程序的最小数据大小是有利的。在例 12.3中,例如,你可以通过使用 short int 代替 int 以得到 2倍的速度。short int 是 16位的, 而 int 是 32位的,所以在相同的向量中,你可以存储 8个 short int 类型的数字,而只能存储 4个 int 类型的数字。因此,在不会产生溢出的情况下,使用足够大的最小位宽的类型类存储问题中的数字是有利的。同样地,如果代码可以向量化,那么使用 float 代替 double 是有好处的,因为 float 占用 32位,而 double 占用 64位。
#include<emmintrin.h>// Define SSE2 intrinsic functions // Function to load unaligned integer vector from array staticinline __m128i LoadVector(voidconst * p) { return _mm_loadu_si128((__m128i const*)p); } // Function to store unaligned integer vector into array staticinlinevoidStoreVector(void * d, __m128i const & x) { _mm_storeu_si128((__m128i *)d, x); } // Branch/loop function vectorized: voidSelectAddMul(shortint aa[], shortint bb[], shortint cc[])、 { // Make a vector of (0,0,0,0,0,0,0,0) __m128i zero = _mm_set1_epi16(0); // Make a vector of (2,2,2,2,2,2,2,2) __m128i two = _mm_set1_epi16(2); // Roll out loop by eight to fit the eight-element vectors: for (int i = 0; i < 256; i += 8) { // Load eight consecutive elements from bb into vector b: __m128i b = LoadVector(bb + i); // Load eight consecutive elements from cc into vector c: __m128i c = LoadVector(cc + i); // Add 2 to each element in vector c __m128i c2 = _mm_add_epi16(c, two); // Multiply b and c __m128i bc = _mm_mullo_epi16 (b, c); // Compare each element in b to 0 and generate a bit-mask: __m128i mask = _mm_cmpgt_epi16(b, zero); // AND each element in vector c2 with the bit-mask: c2 = _mm_and_si128(c2, mask); // AND each element in vector bc with the inverted bit-mask: bc = _mm_andnot_si128(mask, bc); // OR the results of the two AND operations: __m128i a = _mm_or_si128(c2, bc); // Store the result vector in eight consecutive elements in aa: StoreVector(aa + i, a); } }
// Example 12.4c. Same example, vectorized with SSE4.1
// Function to load unaligned integer vector from array staticinline __m128i LoadVector(voidconst * p) { return _mm_loadu_si128((__m128i const*)p); } // Function to store unaligned integer vector into array staticinlinevoidStoreVector(void * d, __m128i const & x) { _mm_storeu_si128((__m128i *)d, x); } voidSelectAddMul(shortint aa[], shortint bb[], shortint cc[]) { // Make a vector of (0,0,0,0,0,0,0,0) __m128i zero = _mm_set1_epi16(0); // Make a vector of (2,2,2,2,2,2,2,2) __m128i two = _mm_set1_epi16(2); // Roll out loop by eight to fit the eight-element vectors: for (int i = 0; i < 256; i += 8) { // Load eight consecutive elements from bb into vector b: __m128i b = LoadVector(bb + i); // Load eight consecutive elements from cc into vector c: __m128i c = LoadVector(cc + i); // Add 2 to each element in vector c __m128i c2 = _mm_add_epi16(c, two); // Multiply b and c __m128i bc = _mm_mullo_epi16 (b, c); // Compare each element in b to 0 and generate a bit-mask: __m128i mask = _mm_cmpgt_epi16(b, zero); // Use mask to choose between c2 and bc for each element __m128i a = _mm_blendv_epi8(bc, c2, mask); // Store the result vector in eight consecutive elements in aa: StoreVector(aa + i, a); } }
你必须为要编译的指令集包含合适的头文件。头文件的名称如下:
Instruction set
Header file
MMX
mmintrin.h
SSE
xmmintrin.h
SSE2
emmintrin.h
SSE3
pmmintrin.h
Suppl. SSE3
tmmintrin.h
SSE4.1
smmintrin.h
SSE4.2
nmmintrin.h (MS) smmintrin.h (Gnu)
AES, PCLMUL
wmmintrin.h
AVX
immintrin.h
AMD SSE4A
ammintrin.h
AMD XOP
ammintrin.h (MS) xopintrin.h (Gnu)
AMD FMA4
fma4intrin.h (Gnu)
all
intrin.h (MS) x86intrin.h (Gnu)
Table 12.2. Header files for intrinsic functions
你必须确保 CPU 支持相应的指令集。如果你包含了高于 CPU 支持的指令集头文件,那么你就有可能插入 CPU 不支持的指令,程序就会崩溃。有关如何检查支持的指令集,请参见13 使用不同指令集生成多个版本的关键代码。
数据对齐
如果数据的地址按可被向量大小(16或32字节)整除方式对齐,那么将数据加载到向量中会更快。这对旧的处理器和英特尔 Atom 处理器都有很大的影响,但在大多数较新的处理器上不是很重要。下面的例子展示了如何对齐数组。
用例 12.4b和例 12.4c中的方式编写程序确实很乏味。通过将这些向量操作包装到 C++ 类中,并使用重载的运算符(如向量加法),可以以更清晰易懂的方式编写相同的代码。运算符是内联的,因此生成的机器码与直接使用指令集函数时的机器码相同。只是编写 a + b 比编写 _mm_add_epi16(a,b) 更容些。
目前可以使用几种不同的预定义的向量类库,包括一个来自 Intel的,一个来自我编写的。我编写的向量类库(VCL )有许多特性,请参见www.agner.org/optimize/#vectorclass。Intel vector class library 最近没有更新,我觉得可能有些过时。
// Example 12.4d. Same example, using Intel vector classes
#include<dvec.h>// Define vector classes // Function to load unaligned integer vector from array staticinline __m128i LoadVector(voidconst * p) { return _mm_loadu_si128((__m128i const*)p); } // Function to store unaligned integer vector into array staticinlinevoidStoreVector(void * d, __m128i const & x) { _mm_storeu_si128((__m128i *)d, x); } voidSelectAddMul(shortint aa[], shortint bb[], shortint cc[]) { // Make a vector of (0,0,0,0,0,0,0,0) Is16vec8 zero(0,0,0,0,0,0,0,0); // Make a vector of (2,2,2,2,2,2,2,2) Is16vec8 two(2,2,2,2,2,2,2,2); // Roll out loop by eight to fit the eight-element vectors: for (int i = 0; i < 256; i += 8) { // Load eight consecutive elements from bb into vector b: Is16vec8 b = LoadVector(bb + i); // Load eight consecutive elements from cc into vector c: Is16vec8 c = LoadVector(cc + i); // result = b > 0 ? c + 2 : b * c; Is16vec8 a = select_gt(b, zero, c + two, b * c); // Store the result vector in eight consecutive elements in aa: StoreVector(aa + i, a); } }
#include"vectorclass.h"// Define vector classes voidSelectAddMul(shortint aa[], shortint bb[], shortint cc[]) { // Define vector objects Vec16s a, b, c; // Roll out loop by eight to fit the eight-element vectors: for (int i = 0; i < 256; i += 16) { // Load eight consecutive elements from bb into vector b: b.load(bb+i); // Load eight consecutive elements from cc into vector c: c.load(cc+i); // result = b > 0 ? c + 2 : b * c; a = select(b > 0, c + 2, b * c); // Store the result vector in eight consecutive elements in aa: a.store(aa+i); } }
// Example 12.7. Vector class code with automatic CPU dispatching #include"vectorclass.h"// vector class library #include<stdio.h>// define fprintf // define function type typedefvoidFuncType(shortint aa[], shortint bb[], shortint cc[]); // function prototypes for each version FuncType SelectAddMul, SelectAddMul_SSE2, SelectAddMul_SSE41, SelectAddMul_AVX2, SelectAddMul_dispatch; // Define function name depending on instruction set #if INSTRSET == 2 // SSE2 #define FUNCNAME SelectAddMul_SSE2 #elif INSTRSET == 5 // SSE4.1 #define FUNCNAME SelectAddMul_SSE41 #elif INSTRSET == 8 // AVX2 #define FUNCNAME SelectAddMul_AVX2 #endif // specific version of the function. Compile once for each version voidFUNCNAME(shortint aa[], shortint bb[], shortint cc[]) { Vec16s a, b, c; // Define biggest possible vector objects // Roll out loop by 16 to fit the biggest vectors: for (int i = 0; i < 256; i += 16) { b.load(bb+i); c.load(cc+i); a = select(b > 0, c + 2, b * c); a.store(aa+i); } } #if INSTRSET == 2 // make dispatcher in only the lowest of the compiled versions #include"instrset_detect.cpp"// instrset_detect function // Function pointer initially points to the dispatcher. // After first call it points to the selected version FuncType * SelectAddMul_pointer = &SelectAddMul_dispatch; // Dispatcher voidSelectAddMul_dispatch(shortint aa[], shortint bb[], shortint cc[]) { // Detect supported instruction set int iset = instrset_detect(); // Set function pointer if (iset >= 8) SelectAddMul_pointer = &SelectAddMul_AVX2; elseif (iset >= 5) SelectAddMul_pointer = &SelectAddMul_SSE41; elseif (iset >= 2) SelectAddMul_pointer = &SelectAddMul_SSE2; else { // Error: lowest instruction set not supported fprintf(stderr, "\nError: Instruction set SSE2 not supported"); return; } // continue in dispatched version return (*SelectAddMul_pointer)(aa, bb, cc); } // Entry to dispatched function call inlinevoidSelectAddMul(shortint aa[], shortint bb[], shortint cc[]) { // go to dispatched version return (*SelectAddMul_pointer)(aa, bb, cc); } #endif// INSTRSET == 2
// Example 12.8a. Sum of a list float a[100]; float sum = 0; for (int i = 0; i < 100; i++) sum += a[i];
上述的代码是串行的,因为每次迭代 sum 的值都依赖于前一次迭代后 sum 的值。诀窍是将循环按 n 展开并重新组织代码,每个值依赖于 n 个位置之前的值,其中 n 是向量中元素的数量。如果 n = 4,我们得到:
1 2 3 4 5 6 7 8 9 10 11
// Example 12.8b. Sum of a list, rolled out by 4 float a[100]; float s0 = 0, s1 = 0, s2 = 0, s3 = 0, sum; for (int i = 0; i < 100; i += 4) { s0 += a[i]; s1 += a[i+1]; s2 += a[i+2]; s3 += a[i+3]; } sum = (s0+s1)+(s2+s3);
现在,s0、s1、s2 和 s3可以组合成一个128位的向量,这样我们就可以在一个操作中做4个加法。如果我们使用 fast math 选项并指定SSE 或更高指令集的选项,一个好的编译器会自动将例 12.8a转换为12.8b,并将代码向量化。
再一些更复杂的情况下不能自动向量化。例如,让我们看看泰勒级数的例子。指数函数可由级数计算:
1 2 3 4
$$ e^x=\sum_{n=0}^\infty\frac{x^n}{n!} $$
用C++ 实现看起来可能是这样的:
1 2 3 4 5 6 7 8 9 10 11 12 13 14 15
// Example 12.9a. Taylor series floatExp(float x) { // Approximate exp(x) for small x float xn = x; // x^n float sum = 1.f; // sum, initialize to x^0/0! float nfac = 1.f; // n factorial for (int n = 1; n <= 16; n++) { sum += xn / nfac; xn *= x; nfac *= n+1; } return sum; }
向量数学库有两种:长向量库(long vector library )和短向量库(short vector library )。为了解释它们之间的区别,我们假设你想用相同的函数对一千个数进行计算。使用长向量库时,你将一个包含一千个数字的数组作为参数提供给库函数,该函数将一千个结果存储在另一个数组中。使用长向量库的缺点是,如果要进行一长串计算,则必须在进行进一步计算前之前,必须每个步骤的中间结果存储在临时数组中。使用短向量库时,你可以将数据集划分为子向量,这些子向量与 CPU 中向量寄存器的大小相匹配。如果向量寄存器可以容纳 4个数字,那么你必须调用库函数 250次,每次将 4个数字装入向量寄存器。库函数将在向量寄存器中返回结果,向量寄存器可以在计算序列中的下一个步骤直接使用,而不需要将中间结果存储在 RAM 内存中。尽管有额外的函数调用,但这可能会更快,因为 CPU 可以在预取下一个函数的代码的同时进行计算。然而,如果计算序列形成了长依赖链,使用短向量的方法可能会处于不利的地位。我们希望 CPU 在完成对第一个子向量的计算之前开始对第二个子向量的计算。长依赖链可能会填满 CPU 中挂起的指令队列,并阻止其充分利用乱序执行的计算能力。
使用最新指令集的一个缺点是缺失了与旧版本微处理器的兼容性。这个难题可以在关键部分通过为不同的 CPU 使用多个版本的代码中来解决。这称为 CPU分派。例如,你可能希望创建一个利用AVX2 指令集优势的版本,另一个只使用SSE2 指令集的,以及一个而不使用任何这些指令集与旧版本微处理器兼容的通用版本。程序应该自动检测CPU 支持哪个指令集。
13.1 CPU分派策略
在开发、测试和维护方面,将一段代码转换成多个版本,每个版本都针对一组特定的 CPU 进行仔细的优化和微调,这代价是相当大的。对于在多个应用程序中使用的通用函数库,这些代价是合理的,但这对于用于特定应用程序的代码并不是总是合理的。如果你考虑使用CPU分派 来生成高度优化的1代码,那么如果可能的话,最好以可重用库的形式来实现。这也使得测试和维护更加容易。
无法正确处理未知处理器。许多 CPU分派器 被设计成只处理已知的处理器。在编写程序时未知的其他品牌或型号,通常会使用通用的代码分支,这是性能最差的分支。我们必须记住,许多用户更愿意在最新的 CPU 上运行速度关键型程序,而这个CPU 在编写程序时很可能是未知的。 CPU分派器 应该给一个未知品牌或型号的 CPU 分配最好的分支,如果 CPU 支持该分支兼容的指令集的话。“我们不支持处理器X”这样的常见借口在这里是不恰当的,它揭示了 CPU分派 的根本缺陷。
创建太多的代码分支。如果你正在创建针对特定的CPU 品牌或特定型号进行调优的分支,那么你很快就会得到许多占用缓存空间且难以维护的分支。你在特定 CPU 型号中处理的任何特定瓶颈或任何特别慢的指令在一两年内都可能变得不相关。通常,只要有两个分支就足够了:一个用于最新的指令集,另一个与最多 5年或 10年前的 CPU 兼容。CPU 市场发展如此之快,以至于今天全新的 CPU 将在明年成为主流。
在某些情况下,特定的代码实现在特定型号的处理器表现糟糕。你可以忽略这个问题,并假设下一个处理器型号将会表现的更好。如果这个问题太重要而不能忽略,那么解决方案是为该版本代码表现的不好的处理器型号创建一个负面清单(negative list )。为该版本代码表现良好的处理器型号列一个可用清单(positive list )不是一个好主意。原因是,每当市场上出现新的、更好的处理器时,都需要更新可用清单,这样的一个清单在你的软件生命周期内几乎肯定会过时。另一方面,在下一代处理器表现更好的情况下,负面清单不需要更新。每当处理器有一个特定的弱点或瓶颈时,生产者很可能会试图修复这个问题,使下一个型号表现的更好。
// Header file for InstructionSet() #include"asmlib.h"
// Define function type with desired paramet typedefintCriticalFunctionType(int parm1, int parm2);
// Function prototype CriticalFunctionType CriticalFunction_Dispatch;
// Function pointer serves as entry point. // After first call it will point to the appropriate function version CriticalFunctionType * CriticalFunction = &CriticalFunction_Dispatch;
// Lowest version intCriticalFunction_386(int parm1, int parm2){...}
// SSE2 version intCriticalFunction_SSE2(int parm1, int parm2){...}
// AVX version intCriticalFunction_AVX(int parm1, int parm2){...}
// Dispatcher. Will be called only first time intCriticalFunction_Dispatch(int parm1, int parm2) { // Get supported instruction set, using asmlib library int level = InstructionSet(); // Set pointer to the appropriate version (May use a table // of function pointers if there are many branches): if (level >= 11) { // AVX supported CriticalFunction = &CriticalFunction_AVX; } elseif (level >= 4) { // SSE2 supported CriticalFunction = &CriticalFunction_SSE2; } else { // Generic version CriticalFunction = &CriticalFunction_386; } // Now call the chosen version return (*CriticalFunction)(parm1, parm2); }
intmain() { int a, b, c; ... // Call critical function through function pointer a = (*CriticalFunction)(b, c); ... return0; }
函数 InstructionSet() 包含在函数库 asmlib。这个函数是独立于操作系统的,它检查 CPU 和操作系统是否支持不同的指令集。例13.1中 CriticalFunction 的不同版本可以在必要时放在单独的模块中,每个模块都为特定的指令集编译。
13.6 GNU 编译器中的 CPU分派
Linux 中引入了一个名为“Gnu 间接函数 ”的特性,并在 2010年被 Gnu 实用工具所支持。该特性用于CPU 分派,并在Gnu C 库中被使用。它需要编译器、链接器和加载器的支持(binutils 的版本为 2.20, glibc 版本为 2.11的 ifunc 分支)。
// Example 13.2. CPU dispatching in Gnu compiler // Same as example 13.1, Requires binutils version 2.20 or later
// Header file for InstructionSet() #include"asmlib.h"
// Lowest version intCriticalFunction_386(int parm1, int parm2){...}
// SSE2 version intCriticalFunction_SSE2(int parm1, int parm2){...}
// AVX version intCriticalFunction_AVX(int parm1, int parm2){...}
// Prototype for the common entry point extern"C"intCriticalFunction(); __asm__ (".type CriticalFunction, @gnu_indirect_function");
// Make the dispatcher function. typeof(CriticalFunction) * CriticalFunctionDispatch(void) __asm__ ("CriticalFunction"); typeof(CriticalFunction) * CriticalFunctionDispatch(void) { // Returns a pointer to the desired function version // Get supported instruction set, using asmlib library int level = InstructionSet(); // Set pointer to the appropriate version (May use a table // of function pointers if there are many branches): if (level >= 11) { // AVX supported return &CriticalFunction_AVX; } if (level >= 4) { // SSE2 supported return &CriticalFunction_SSE2; } // Default version return &CriticalFunction_386; }
intmain() { int a, b, c; ... // Call critical function a = CriticalFunction(b, c); ... return0; }
// Example 14.2b float a; int b; constfloat OneOrTwo5[2] = {1.0f, 2.5f}; a = OneOrTwo5[b & 1];
在这里,因为安全性的原因,我将 b 按位与上 1,b & 1的值肯定只有 0 或 1(参见14.2 边界检查)。如果 b 的值肯定为 0 或 1,那么就可以省略对 b 的额外检查。使用 a = OneOrTwo5[b!=0],同样可以正确运行,但是效率稍低。但是,当 b 是 float 或 double 类型时,这种方法效率很低,因为我测试的所有编译器对OneOrTwo5[b!=0] 的实现都是 OneOrTwo5[(b!=0) ? 1 : 0],在这种情况下,我们无法摆脱分支。当 b 是浮点数时,编译器使用不同的实现似乎不合逻辑。我觉得原因是编译器制的开发人员认为浮点数比较比整数比较更容易预测。对于表达式 a = 1.0f + b * 1.5f,当 b 是一个浮点数时是高效的,但如果 b 是一个整数则效率较低,因为整数到浮点数的转换比查找表花费更多的时间。
// Example 14.3b int n; charconst * const Greek[4] = { "Alpha", "Beta", "Gamma", "Delta" }; if ((unsignedint)n < 4) { // Check that index is not out of range printf(Greek[n]); }
表的声明有两个 const,因为它们指向的指针和文本都是常量。
14.2 边界检查
在C++ 中,通常有必要检查数组索引是否超出范围。这常常看起来是这样的:
1 2 3 4 5 6 7 8 9 10 11 12 13
// Example 14.4a
constint size = 16; int i; float list[size]; ... if (i < 0 || i >= size) { cout << "Error: Index out of range"; } else { list[i] += 1.0f; }
i < 0 和 i >= size 这两个比较可以使用一个比较替换:
1 2 3 4 5 6 7 8 9
// Example 14.4b if ((unsignedint)i >= (unsignedint)size) { cout << "Error: Index out of range"; } else { list[i] += 1.0f; }
当 i 被解释为无符号整数时,i 可能的负值将以一个较大的正数出现,这将触发错误条件。用一个比较替换两个比较可以加快代码的速度,因为测试一个条件相对比较昂贵,而类型转换根本不会生成额外的代码。
这个方法可以扩展到一般情况下:你想要检查一个整数是否在一个特定的区间之内:
1 2 3 4 5
// Example 14.5a
constint min = 100, max = 110; int i; ... if (i >= min && i <= max) { ...
可以修改成:
1 2 3
// Example 14.5b
if ((unsignedint)(i - min) <= (unsignedint)(max - min)) { ...
如果所需区间的长度是 2的幂,则有一种更快的方法来限制整数的范围。例如:
1 2 3 4 5
// Example 14.6
float list[16]; int i; ... list[i & 15] += 1.0f;
这需要略微解释一下。i&15 的值肯定在 0 到 15 的区间内。如果 i 在这个区间之外,例如 i = 18 ,那么 & 运算符(按位与)将 i 的二进制值截断为 4 位,结果将是 2。结果与 i 除上 16 的余数相同。如果我们不需要错误消息的话,这种方法在数组索引超出范围时可以防止程序出错。需要注意的是,这种方法只适用于2的幂(即2、4、8、16、32、64、……)。通过按位与上$2^{n -1}$,我们可以确保一个数的值小于 $2^n$,并且不是负的。按位与操作隔离数字中有效的低 n 位,并将所有其他位设为零。
structS1 { int a; int b; int c; int UnusedFiller; }; intorder(int x); constint size = 100; S1 list[size]; int i, j; ... for (i = 0; i < size; i++) { j = order(i); list[j].a = list[j].b + list[j].c; }
除以一个常数比除以一个变量快的多,因为编译器优化可以通过选择合适的 $n$ 使用公式: $a * (2^n/b) >> n$ 来计算 $a/b$。 常量 $(2^n/b)$ 是被预先计算好的,乘法是通过位的扩展数(extended number of bits)来完成的。该方法稍微复杂一些,因为必须添加符号和舍入误差的各种更正。该方法在手册2: “Optimizing subroutines in assembly language” 中有更详细的描述。当被除数是无符号的,该方法会快的多。
以下准则可用于改进包含整数除法的代码:
整数除以常数比变量快。确保在编译时知道除数的值。
如果常数是 2的幂的话,整数除法会更快。
当被除数是无符号时,整数除以常量会更快。
例如:
1 2 3 4 5 6 7 8
// Example 14.10
int a, b, c; a = b / c; // This is slow a = b / 10; // Division by a constant is faster a = (unsignedint)b / 10; // Still faster if unsigned a = b / 16; // Faster if divisor is a power of 2 a = (unsignedint)b / 16; // Still faster if unsigned
相同的准则同样适用于取模运算:
1 2 3 4 5 6 7 8
// Example 14.11
int a, b, c; a = b % c; // This is slow a = b % 10; // Modulo by a constant is faster a = (unsignedint)b % 10; // Still faster if unsigned a = b % 16; // Faster if divisor is a power of 2 a = (unsignedint)b % 16; // Still faster if unsigned
float a, b; a = b * 1.2; // Mixing float and double is bad
C/C++ 标准规定所有浮点数常量在默认情况下都是双精度的。 所以在这个例子中, 1.2 是一个双精度的常量。因此,在将 b 与双精度常数相乘之前,需要将 b 从单精度转换为双精度,然后再将结果转换回单精度。这些转换需要很长的时间。你可以通过避免转换,来使代码达到 5倍的效率,无论是通过使常数变成单精度或 使 a 和 b 变成双精度的:
1 2 3 4 5 6 7
// Example 14.18b
float a, b; a = b * 1.2f; // everything is float // Example 14.18c double a, b; a = b * 1.2; // everything is double
constint size = 100; // Array of 100 doubles: union {double d; unsignedint u[2]} a[size]; unsignedint absvalue, largest_abs = 0; int i, largest_index = 0; for (i = 0; i < size; i++) { // Get upper 32 bits of a[i] and shift out sign bit: absvalue = a[i].u[1] * 2; // Find numerically largest element (approximately): if (absvalue > largest_abs) { largest_abs = absvalue; largest_index = i; } }
在Windows 中,dll 使用重定位。链接器将dll 重新定位到特定的加载地址。如果这个地址不是空的,那么dll 将被加载程序重新定位(rebase )到另一个地址。在主可执行文件中调用dll 中的函数要经过导入表或指针。dll 中的变量可以通过 main 函数中的导入指针来访问(A variable in a DLL can be accessed from main through an imported pointer),但是很少使用这个特性。通过函数调用来交换数据或指向数据的指针更为常见。对dll 内数据的内部引用在 32 位模式下使用绝对引用,在 64位模式下使用相对引用。后者的效率略微高一点,因为相对引用在加载时不需要重新定位。
Gnu 编译器 5.1 及以后版本有一个选项:-fno-semantic-interposition,可以使它能够避免使用 PLT 和 GOT,但仅限于同一文件中的引用。通过使用内联汇编代码为变量提供两个名称,一个全局名称和一个本地名称,并为本地引用使用本地名称,可以得到相同的效果。
尽管有这些技巧,当使用多个模块(源文件)生成共享对象时,并且存在一个模块调用另一个模块时,你可能仍然会得到错误消息:“ “relocation R_X86_64_PC32 against symbol `functionname’ can not be used when making a shared object; recompile with -fPIC”。我至今没有找到该问题的解决方法。
BSD 中的共享变量 BSD 中的共享对象与 Linux 中的工作方式相同。
32位 Mac OS X
32位Mac OS X 的编译器默认情况下使位置无关代码和延迟绑定,即使不使用共享对象。目前在 32位Mac 代码中用于计算自相对地址的方法使用了一种不幸的方法,它会导致错误地预测返回地址,从而延迟执行(有关返回预测的解释,请参阅手册3:“The microarchitecture of Intel, AMD and VIA CPUs”)。
只要在编译器中关闭与位置无关代码的标志,就可以显著加速不属于共享对象的所有代码。因此,请记住,在为 32位Mac OS X 编译时,总是要指定编译器选项 -fno-pic,除非你正在创建一个共享对象。
系统代码必须遵守寄存器使用的某些规则,如手册5中的“Calling conventions for different C++ compilers and operating systems”中 “内核代码中的寄存器用法”一章所述。因此,你只能使用针对系统代码的编译器和函数库。系统代码应该使用 C、C++ 或汇编语言 编写。
// Example 15.1b. Calculate integer power using loop
doubleipow(double x, unsignedint n) { double y = 1.0; // used for multiplication while (n != 0) { // loop for each bit in nn if (n & 1) y *= x; // multiply if bit = 1 x *= x; // square x n >>= 1; // get next bit of n } return y; // return y = pow(x,n) } doublexpow10(double x) { returnipow(x,10); // ipow faster than pow }
当我们展开循环并重新组织时,例 15.1b 中使用的方法将更容易理解:
1 2 3 4 5 6 7 8 9 10
// Example 15.1c. Calculate integer power, loop unrolled
// Example 15.1d. Integer power using template metaprogramming
// Template for pow(x,N) where N is a positive integer constant. // General case, N is not a power of 2: template <bool IsPowerOf2, int N> classpowN { public: staticdoublep(double x){ // Remove right-most 1-bit in binary representation of N: #define N1 (N & (N-1)) return powN<(N1&(N1-1))==0,N1>::p(x) * powN<true,N-N1>::p(x); #undef N1 } };
// Partial template specialization for N a power of 2 template <int N> classpowN<true,N> { public: staticdoublep(double x) { return powN<true,N/2>::p(x) * powN<true,N/2>::p(x); } };
// Full template specialization for N = 1. This ends the recursion template<> classpowN<true,1> { public: staticdoublep(double x) { return x; } };
// Full template specialization for N = 0 // This is used only for avoiding infinite loop if powN is // erroneously called with IsPowerOf2 = false where it should be true. template<> classpowN<true,0> { public: staticdoublep(double x) { return1.0; } };
// Function template for x to the power of N template <int N> staticinlinedoubleIntegerPower(double x) { // (N & N-1)==0 if N is a power of 2 return powN<(N & N-1)==0,N>::p(x); }
// Use template to get x to the power of 10 doublexpow10(double x) { returnIntegerPower<10>(x); }
如果你想知道这是怎么回事,请看下面的解释。如果你不确定是否需要,可以跳过下面的解释。
在C++ 模板元编程中,循环被实现为递归模板。powN 模板正在调用自己,以便模拟 例 15.1b 中的 while 循环。分支是通过(部分)模板特化实现的, 这就是对 例 15.1b中的 if 分支的实现。递归必须始终以非递归模板特化结束,而不是在模板中包含分支。
powN 模板是类模板而不是函数模板,因为只允许对类进行部分模板特化。将 N 分解成二进制表示的各个位是非常需要技巧的的。我使用的技巧是 N1 = N&(N-1) 给得到 N 的去掉最右边的 1 位的值。如果 N 是 2 的幂,那么 N&(N-1) 为 0。常量 N1 可以用其他方法定义,而不是只能使用宏定义,但是这里使用的方法是我尝试过的所有编译器中唯一全部适用的方法。
Microsoft、Intel 和Gnu 编译器实际上按照预期地将 例15.1d 化简到 例 15.1c,而Borland 和Digital Mars 编译器产生的代码不太理想,因为它们无法消除公共子表达式。
D 语言 允许编译时 if 语句(称为 static if),但不没有编译时循环 或编译时生成标识符名称。我们只能希望这样的功能在将来能够实现。如果C++ 的未来版本应该会允许 编译时 If 和编译时 while 循环,那么将例 15.1b转换为元编程将非常简单。MASM 汇编语言 具有完整的元编程特性,包括通过字符串函数来定义函数名和变量名的能力。在手册2“Optimizing subroutines in assembly language”的“宏循环”一节中,提供了一个类似于例 15.1b和 例 15.1d的使用汇编语言的元编程实现。
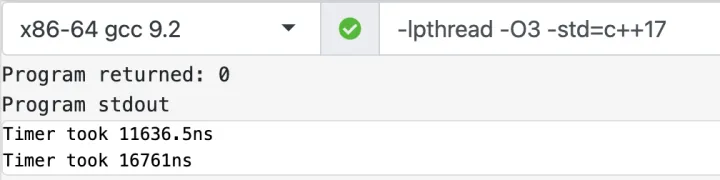
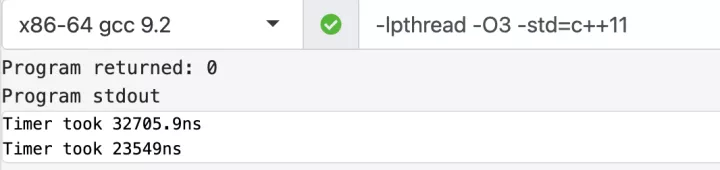
#include<stdio.h> #include<asmlib.h>// Use ReadTSC() from library asmlib.. // or from example 16.1 voidCriticalFunction(); // This is the function we want to measure ... constint NumberOfTests = 10; // Number of times to test int i; longlong time1; longlong timediff[NumberOfTests]; // Time difference for each test for (i = 0; i < NumberOfTests; i++) { // Repeat NumberOfTests times time1 = ReadTSC(); // Time before test CriticalFunction(); // Critical function to test timediff[i] = ReadTSC() - time1; // (time after) - (time before) } printf("\nResults:"); // Print heading for (i = 0; i < NumberOfTests; i++) { // Loop to print out results printf("\n%2i %10I64i", i, timediff[i]); }
Scott Meyers: “Effective C++”. Addison-Wesley. Third Edition, 2005; and “More Effective C++”. Addison-Wesley, 1996。这两本书包含了许多关于高级c++编程的技巧,如何避免难以发现的错误,以及一些提高性能的技巧。
Stefan Goedecker and Adolfy Hoisie: “Performance Optimization of Numerically Intensive Codes”, SIAM 2001。关于 C++ 和 Fortran 代码优化的高级书籍。主要关注具有大数据集的数学应用。涵盖个人电脑,工作站和科学向量处理器。
Henry S. Warren, Jr.: “Hacker’s Delight”. Addison-Wesley, 2003。包含许多位操作技巧。
Michael Abrash: “Zen of code optimization”, Coriolis group books 1994。大部分已经过时了。
Rick Booth: “Inner Loops: A sourcebook for fast 32位 software development”, AddisonWesley 1997。大部分已经过时了。
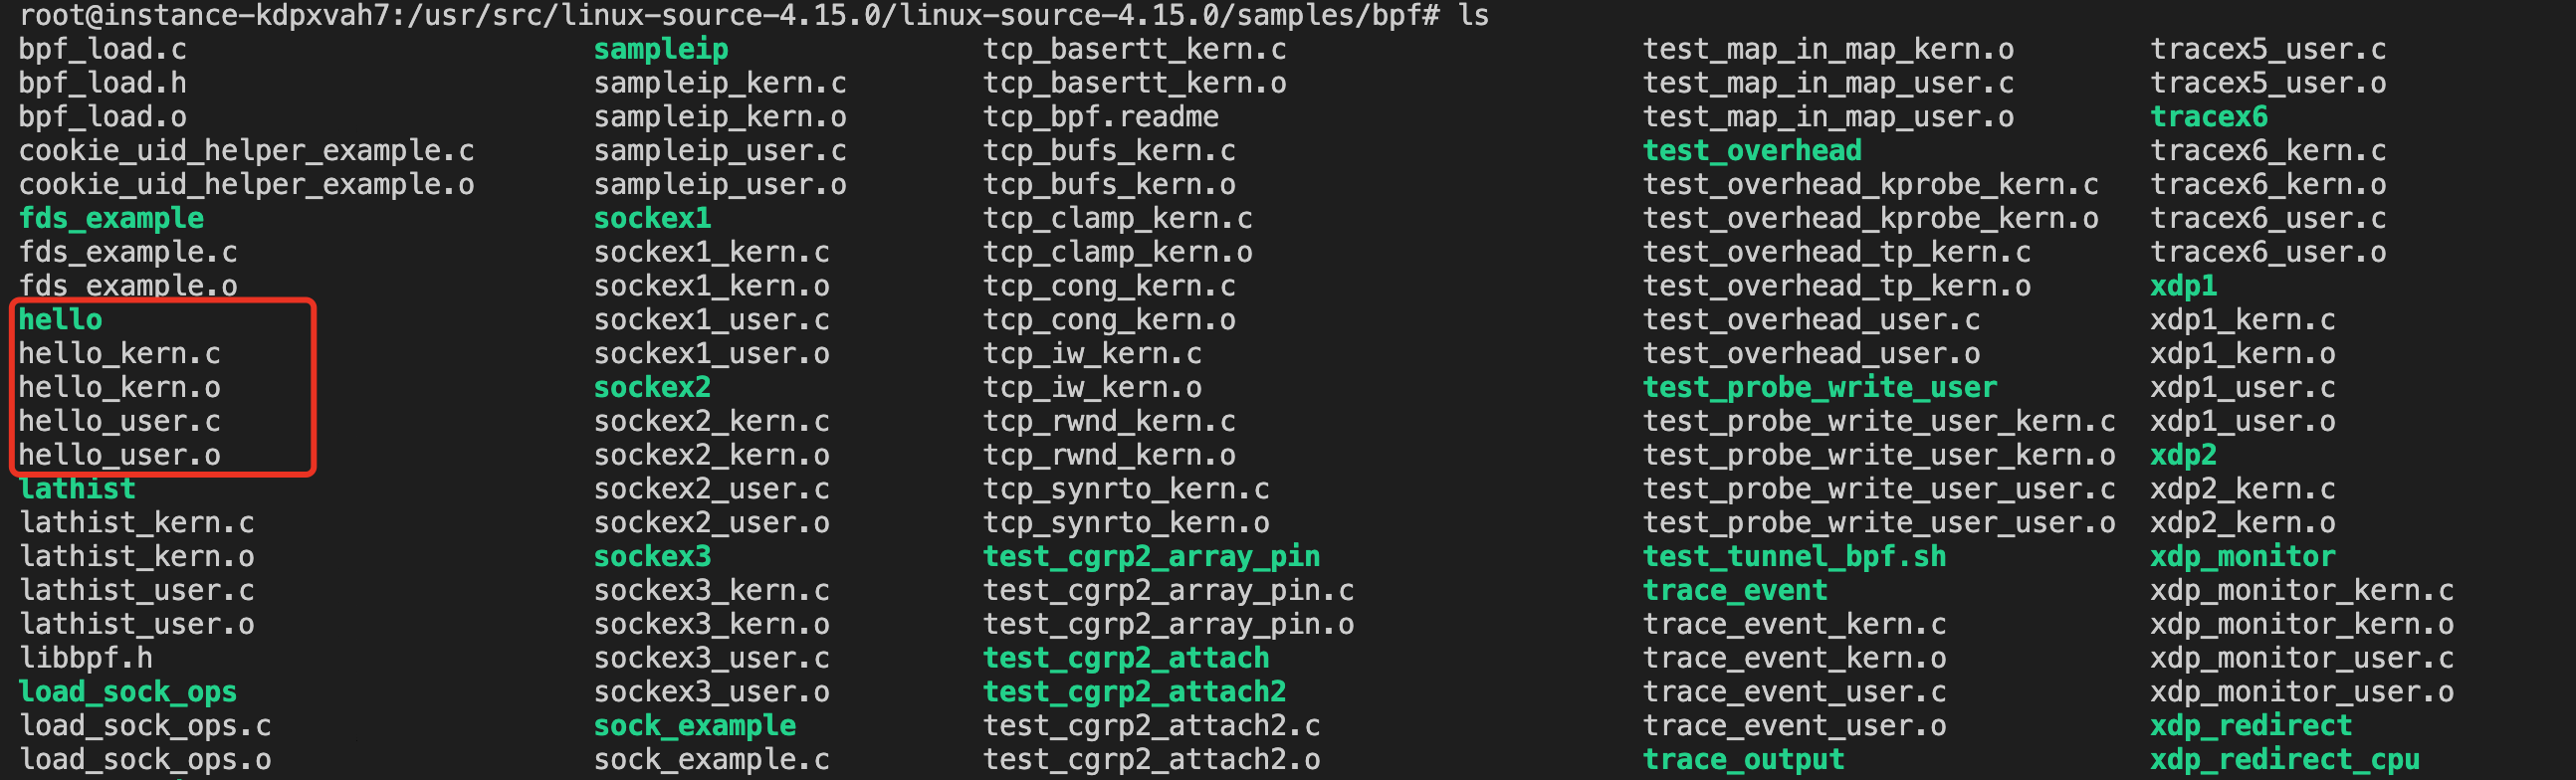
# 第一种方式 # 先搜索 > apt-cache search linux-source linux-source - Linux kernel source with Ubuntu patches linux-source-4.15.0 - Linux kernel source for version 4.15.0 with Ubuntu patches linux-source-4.18.0 - Linux kernel source for version 4.18.0 with Ubuntu patches linux-source-5.0.0 - Linux kernel source for version 5.0.0 with Ubuntu patches linux-source-5.3.0 - Linux kernel source for version 5.3.0 with Ubuntu patches # 再安装 > apt install linux-source-4.15.0 # 第二种方式 > apt-get source linux Reading package lists... Done NOTICE: 'linux' packaging is maintained in the 'Git' version control system at: git://git.launchpad.net/~ubuntu-kernel/ubuntu/+source/linux/+git/bionic Please use: git clone git://git.launchpad.net/~ubuntu-kernel/ubuntu/+source/linux/+git/bionic to retrieve the latest (possibly unreleased) updates to the package. Need to get 167 MB of source archives. Get:2 https://mirrors.ustc.edu.cn/ubuntu bionic-updates/main linux 4.15.0-99.100 (tar) [158 MB] ... # 以上两种方式,内核源代码均下载至/usr/src/目录下
if (pid_target && pid_target != pid) returnfalse; // Use bpf_printk to print the process information bpf_printk("Process ID: %d enter sys openat\n", pid); return0; }
/// "Trace open family syscalls." char LICENSE[] SEC("license") = "GPL";
Optional arguments: -h, --help shows help message and exits -v, --version prints version information and exits --verbose prints libbpf debug information --pid_target Process ID to trace
Built with eunomia-bpf framework. See https://github.com/eunomia-bpf/eunomia-bpf for more information.
可以通过--pid_target参数来指定要捕获的进程的 pid,例如:
1 2
$ sudo ./ecli run package.json --pid_target 618 Runing eBPF program...
/* Format of u[ret]probe section definition supporting auto-attach: * u[ret]probe/binary:function[+offset] * * binary can be an absolute/relative path or a filename; the latter is resolved to a * full binary path via bpf_program__attach_uprobe_opts. * * Specifying uprobe+ ensures we carry out strict matching; either "uprobe" must be * specified (and auto-attach is not possible) or the above format is specified for * auto-attach. */ SEC("uretprobe//bin/bash:readline") intBPF_KRETPROBE(printret, constvoid *ret) { char str[MAX_LINE_SIZE]; char comm[TASK_COMM_LEN]; u32 pid;
$ sudocat /sys/kernel/debug/tracing/trace_pipe node-3517 [003] d..31 82575.798191: bpf_trace_printk: PID 3517 (node) sent signal 0 to PID 3427, ret = 0 node-15194 [003] d..31 82575.849227: bpf_trace_printk: PID 15194 (node) sent signal 0 to PID 3427, ret = 0 node-30016 [003] d..31 82576.001361: bpf_trace_printk: PID 30016 (node) sent signal 0 to PID 3427, ret = 0 cpptools-srv-38617 [002] d..31 82576.461085: bpf_trace_printk: PID 38617 (cpptools-srv) sent signal 0 to PID 30496, ret = 0 node-30040 [002] d..31 82576.467720: bpf_trace_printk: PID 30016 (node) sent signal 0 to PID 3427, ret = 0
即使进程拥有它需要的所有资源,它也不会立即开始运行。它会转移到可运行状态,与其他处在相同状态的进程一起排队。CPU可以在接下来的几秒钟或毫秒内执行这些进程。调度器为 CPU 排列进程,并决定下一个要执行的进程。
根据系统的硬件配置,这个可运行队列(称为 CPU 运行队列)的长度可以短也可以长。短的运行队列长度表示 CPU 没有被充分利用。另一方面,如果运行队列长,那么可能意味着 CPU 不够强大,无法执行所有的进程,或者 CPU 的核心数量不足。在理想的 CPU 利用率下,运行队列的长度将等于系统中的核心数量。
进程调度延迟,也被称为 “run queue latency”,是衡量线程从变得可运行(例如,接收到中断,促使其处理更多工作)到实际在 CPU 上运行的时间。在 CPU 饱和的情况下,你可以想象线程必须等待其轮次。但在其他奇特的场景中,这也可能发生,而且在某些情况下,它可以通过调优减少,从而提高整个系统的性能。
Optional arguments: -h, --help shows help message and exits -v, --version prints version information and exits --verbose prints libbpf debug information --filter_cg set value of bool variable filter_cg --targ_per_process set value of bool variable targ_per_process --targ_per_thread set value of bool variable targ_per_thread --targ_per_pidns set value of bool variable targ_per_pidns --targ_ms set value of bool variable targ_ms --targ_tgid set value of pid_t variable targ_tgid
Built with eunomia-bpf framework. See https://github.com/eunomia-bpf/eunomia-bpf for more information.
$ sudo ecli run examples/bpftools/runqlat/package.json key = 4294967295 comm = rcu_preempt
/* successfully submit it to user-space for post-processing */ bpf_ringbuf_submit(e, 0); return0; }
SEC("tp/sched/sched_process_exit") inthandle_exit(struct trace_event_raw_sched_process_template* ctx) { structtask_struct *task; structevent *e; pid_t pid, tid; u64 id, ts, *start_ts, duration_ns = 0; /* get PID and TID of exiting thread/process */ id = bpf_get_current_pid_tgid(); pid = id >> 32; tid = (u32)id;
/* ignore thread exits */ if (pid != tid) return0;
/* if we recorded start of the process, calculate lifetime duration */ start_ts = bpf_map_lookup_elem(&exec_start, &pid); if (start_ts) duration_ns = bpf_ktime_get_ns() - *start_ts; elseif (min_duration_ns) return0; bpf_map_delete_elem(&exec_start, &pid);
/* if process didn't live long enough, return early */ if (min_duration_ns && duration_ns < min_duration_ns) return0;
/* reserve sample from BPF ringbuf */ e = bpf_ringbuf_reserve(&rb, sizeof(*e), 0); if (!e) return0;
/* fill out the sample with data */ task = (struct task_struct *)bpf_get_current_task();
// if we recorded start of the process, calculate lifetime duration start_ts = bpf_map_lookup_elem(&exec_start, &pid); if (start_ts) duration_ns = bpf_ktime_get_ns() - *start_ts; elseif (min_duration_ns) return0; bpf_map_delete_elem(&exec_start, &pid);
// if process didn't live long enough, return early if (min_duration_ns && duration_ns < min_duration_ns) return0;
/* Load & verify BPF programs */ err = bootstrap_bpf__load(skel); if (err) { fprintf(stderr, "Failed to load and verify BPF skeleton\n"); goto cleanup; }
/* Attach tracepoints */ err = bootstrap_bpf__attach(skel); if (err) { fprintf(stderr, "Failed to attach BPF skeleton\n"); goto cleanup; }
/* Set up ring buffer polling */ rb = ring_buffer__new(bpf_map__fd(skel->maps.rb), handle_event, NULL, NULL); if (!rb) { err = -1; fprintf(stderr, "Failed to create ring buffer\n"); goto cleanup; }
/* Process events */ printf("%-8s %-5s %-16s %-7s %-7s %s\n", "TIME", "EVENT", "COMM", "PID", "PPID", "FILENAME/EXIT CODE"); while (!exiting) { err = ring_buffer__poll(rb, 100/* timeout, ms */); /* Ctrl-C will cause -EINTR */ if (err == -EINTR) { err = 0; break; } if (err < 0) { printf("Error polling perf buffer: %d\n", err); break; } }
cleanup: /* Clean up */ ring_buffer__free(rb); bootstrap_bpf__destroy(skel);
intmain(){ ... for (cpu = 0; cpu < num_cpus; cpu++) { /* skip offline/not present CPUs */ if (cpu >= num_online_cpus || !online_mask[cpu]) continue;
/* Set up performance monitoring on a CPU/Core */ pefd = perf_event_open(&attr, pid, cpu, -1, PERF_FLAG_FD_CLOEXEC); if (pefd < 0) { fprintf(stderr, "Fail to set up performance monitor on a CPU/Core\n"); err = -1; goto cleanup; } pefds[cpu] = pefd;
/* Attach a BPF program on a CPU */ links[cpu] = bpf_program__attach_perf_event(skel->progs.profile, pefd); if (!links[cpu]) { err = -1; goto cleanup; } } ... }
event_handler() 函数用于处理从 ring buffer 接收到的事件。它接收一个 data 参数,指向 ring buffer 中的数据,size 参数表示数据的大小。函数首先将 data 指针转换为 stacktrace_event 结构体指针,然后检查内核和用户空间栈的大小。如果栈为空,则直接返回。接下来,函数输出进程名称、进程 ID 和 CPU ID 信息。然后分别显示内核栈和用户空间栈的回溯。调用 show_stack_trace() 函数时,分别传入内核栈和用户空间栈的地址、大小和进程 ID。
inet_csk(sk)->icsk_ext_hdr_len = 0; if (inet_opt) inet_csk(sk)->icsk_ext_hdr_len = inet_opt->opt.optlen;
tp->rx_opt.mss_clamp = TCP_MSS_DEFAULT;
/* Socket identity is still unknown (sport may be zero). * However we set state to SYN-SENT and not releasing socket * lock select source port, enter ourselves into the hash tables and * complete initialization after this. */ tcp_set_state(sk, TCP_SYN_SENT); err = inet_hash_connect(tcp_death_row, sk); if (err) goto failure;
if (likely(!tp->repair)) { if (!tp->write_seq) WRITE_ONCE(tp->write_seq, secure_tcp_seq(inet->inet_saddr, inet->inet_daddr, inet->inet_sport, usin->sin_port)); tp->tsoffset = secure_tcp_ts_off(net, inet->inet_saddr, inet->inet_daddr); }
inet->inet_id = get_random_u16();
if (tcp_fastopen_defer_connect(sk, &err)) return err; if (err) goto failure;
err = tcp_connect(sk);
if (err) goto failure;
return 0;
failure: /* * This unhashes the socket and releases the local port, * if necessary. */ tcp_set_state(sk, TCP_CLOSE); inet_bhash2_reset_saddr(sk); ip_rt_put(rt); sk->sk_route_caps = 0; inet->inet_dport = 0; return err; } EXPORT_SYMBOL(tcp_v4_connect);
$ sudo ecli run package.json -h A simple eBPF program
Usage: package.json [OPTIONS]
Options: --verbose Whether to show libbpf debug information --targ_laddr_hist Set value of `bool` variable targ_laddr_hist --targ_raddr_hist Set value of `bool` variable targ_raddr_hist --targ_show_ext Set value of `bool` variable targ_show_ext --targ_sport <targ_sport> Set value of `__u16` variable targ_sport --targ_dport <targ_dport> Set value of `__u16` variable targ_dport --targ_saddr <targ_saddr> Set value of `__u32` variable targ_saddr --targ_daddr <targ_daddr> Set value of `__u32` variable targ_daddr --targ_ms Set value of `bool` variable targ_ms -h, --help Print help -V, --version Print version
Built with eunomia-bpf framework. See https://github.com/eunomia-bpf/eunomia-bpf for more information.
# ./memleak -p $(pidof allocs) Attaching to pid 5193, Ctrl+C to quit. [11:16:33] Top 2 stacks with outstanding allocations: 80 bytes in 5 allocations from stack main+0x6d [allocs] __libc_start_main+0xf0 [libc-2.21.so]
[11:16:34] Top 2 stacks with outstanding allocations: 160 bytes in 10 allocations from stack main+0x6d [allocs] __libc_start_main+0xf0 [libc-2.21.so]
perf trace cksum /usr/bin/cksum perf stat -e 'ext4:*' -a perf record -e ext4:ext4_da_write_begin -a // 由于perf.data是写入文件系统的,如果跟踪的是文件系统的写事件,那么就会产生一个自反馈循环
# These are configurations for the module set named "default" default: # roots: # tcl: $spack/share/spack/modules # lmod: $spack/share/spack/lmod enable: - tcl
# Default configurations if lmod is enabled lmod: hierarchy: - mpi
Description: The Vienna Ab initio Simulation Package (VASP) is a computer program for atomic scale materials modelling, e.g. electronic structure calculations and quantum-mechanical molecular dynamics, from first principles.
Variants: Name [Default] When Allowed values Description =============== ==== =============== ====================================
cuda [off] -- on, off Enables running on Nvidia GPUs scalapack [off] -- on, off Enables build with SCALAPACK vaspsol [off] -- on, off Enable VASPsol implicit solvation model https://github.com/henniggroup/VASPsol Installation Phases: edit build install
Build Dependencies: blas cuda fftw lapack mpi netlib-scalapack qd rsync
Link Dependencies: blas cuda fftw lapack mpi netlib-scalapack qd Run Dependencies: mpi
==> Error: You can either: a) use a more specific spec, or b) specify the spec by its hash (e.g. `spack uninstall /hash`), or c) use `spack uninstall --all` to uninstall ALL matching specs.
• CAS based,CAS 是 compare and swap,这是一个原子操作(spinlock 的实现同样需要 compare and swap,但区别是 spinlock 只有两个状态 LOCKED 和 UNLOCKED,而 CAS 的变量可以有多个状态);其次,CAS 的实现必须由硬件来保障(原子操作),CAS 一次可以操作 32 bits,也有 MCAS,一次可以修改一块内存。基于 CAS 实现的数据结构没有一个统一、一致的实现方法,所以有时不如直接加锁的算法那么简单,直接,针对不同的数据结构,有不同的 CAS 实现方法,读者可以自己搜索。
typedefstructnode_t { TYPE value; node_t *next } NODE; typedefstructqueue_t { NODE *head; NODE *tail; LOCK q_h_lock; LOCK q_t_lock; } Q; initialize(Q *q) { node = new_node() // Allocate a free node node->next = NULL// Make it the only node in the linked list q->head = q->tail = node // Both head and tail point to it q->q_h_lock = q->q_t_lock = FREE // Locks are initially free } enqueue(Q *q, TYPE value) { node = new_node() // Allocate a new node from the free list node->value = value // Copy enqueued value into node node->next = NULL// Set next pointer of node to NULL lock(&q->q_t_lock) // Acquire t_lock in order to access Tail q->tail->next = node // Link node at the end of the queue q->tail = node // Swing Tail to node unlock(&q->q_t_lock) // Release t_lock } dequeue(Q *q, TYPE *pvalue) { lock(&q->q_h_lock) // Acquire h_lock in order to access Head node = q->head // Read Head new_head = node->next // Read next pointer if new_head == NULL// Is queue empty? unlock(&q->q_h_lock) // Release h_lock before return return FALSE // Queue was empty endif *pvalue = new_head->value // Queue not empty, read value q->head = new_head // Swing Head to next node unlock(&q->q_h_lock) // Release h_lock free(node) // Free node return TRUE // Queue was not empty, dequeue succeeded }
只要引入了异常机制,无论系统是否会抛出异常,异常代码都会影响代码的大小与性能;未触发异常时对系统影响并不明显,主要影响一些编译优化手段;触发异常之后按异常实现机制的不同,其对系统性能的影响也不相同,不过一般很明显。所以,不用担心异常对正常代码逻辑性能的影响,同时不要借用异常机制处理业务逻辑。现代 C++ 编译器所使用的异常机制对正常代码性能的影响并不明显,只有出现异常的时候异常机制才会影响整个系统的性能,这里有一些测试数据。
伪共享(false sharing):就是说两个无关的变量,一个读,一个写,而这两个变量在一个cache line里面。那么写会导致cache line失效(通常是在多核编程里面,两个变量在不同的core上引用)。读写分离是一个很难运用的技巧,特别是在code很复杂的情况下。需要不断地调试,是个力气活(如果有工具帮助会好一点,比如 cache miss时触发 cpu 的 execption 处理之类的)
6、总结
上面所列举的大多数还是通用的高性能编程手段,从物理硬件 CPU、内存、硬盘、网卡到软件层面的通信、缓存、算法、架构每一个环节的优化都是通往高性能的道路。软件性能瓶颈定位的常用手段有 perf(火焰图)以及在 Intel CPU 上使用 pmu-tools 进行 TopDown 分析。接下来,我们将从 C++ 编程语言本身层面出发,探讨下不同场景下最高效的 C++ 代码实现方式。
当执行环节遇到数据依赖,以及缓存未命中等场景,就会导致整体停顿的产生,其中 MEM 环节的影响尤其明显,主要是因为多级缓存及多核共享带来的单次访存所需周期数参差不齐的现象越来越严重。为了减轻停顿的影响,现代 CPU 引入了乱序执行结合超标量的技术,什么意思呢?一方面:对于重点执行部件,比如计算、访存,增加多份来支持并行;另一方面:在执行部件前引入缓冲池/队列机制。最终从流水线模式向类似”多线程”的方式靠拢。
{ // Lock Free / Atomic CAS auto curr = atomic_sum.load(std::memory_order_relaxed); auto next = curr; do { next = curr + calc(seq, workload) } while (!atomic_sum.compare_exchange_weak(curr, next, std::memory_ordered_relaxed)); }
多个 CPU 同时对同一个缓存行的数据进行修改,导致 CPU cache 的数据不一致,也就是缓存失效问题。为什么伪共享只发生在多线程的场景,而多进程的场景不会有问题?这是因为 linux 虚拟内存的特性,各个进程的虚拟地址空间是相互隔离的,也就是说在数据不进行缓存行对齐的情况下,CPU 执行进程 1 时加载的一个缓存行的数据,只会属于进程 1,而不会存在一部分是进程 1、另外一部分是进程 2。
每个 CPU 缓存行都在四个状态之间互相转换,以此决定 CPU 缓存是否失效,比如 CPU 对一个缓存行执行了写入操作,则此操作会导致其他 CPU 的该缓存行进入 Invalid 无效状态,CPU 需要使用该缓存行的时候需要从内存中重新读取。由此就解决了多 CPU 之间的缓存一致性问题。消除伪共享有如下两种方法:
微服务、流式计算、缓存,这几种业务模型几乎涵盖了所有主流的后端服务场景。而这几种业务对内存的应用有一个重要的特征:拥有边界明确的生命周期。比如在早期的 server 设计中,每个 client 请求都分配一个单独的线程处理,处理完再整体销毁。但随着新型的子任务级线程池并发技术的广泛应用,即请求细分为多个子任务充分利用多核并发来提升计算性能。
// Kernel function to add the elements of two arrays __global__ // __global__ 表示其将在 GPU 上运行 void add(int n, float *x, float *y) { for (int i = 0; i < n; i++) y[i] = x[i] + y[i]; }
int main(void) { int N = 1<<20; // 1M elements
float *x = new float[N]; float *y = new float[N];
// initialize x and y arrays on the host for (int i = 0; i < N; i++) { x[i] = 1.0f; y[i] = 2.0f; }
// float *dev_x, *dev_y; int size = N * sizeof(float); cudaError_t err err = cudaMalloc((void **)&dev_x, size); // 在 GPU 上分配内存 if (err != cudaSuccess) { printf("%s in %s at line %d\n", cudaGetErrorString(err),__FILE__,__LINE__); exit(EXIT_FAILURE); } err = cudaMalloc((void **)&dev_y, size); if (err != cudaSuccess) { printf("%s in %s at line %d\n", cudaGetErrorString(err),__FILE__,__LINE__); exit(EXIT_FAILURE); } cudaMemcpy(dev_x, x, size, cudaMemcpyHostToDevice); // 把输入数据从 Host 内存到 Device 内存 cudaMemcpy(dev_y, y, size, cudaMemcpyHostToDevice);
Scalability and thread reuse. By using a loop, you can support any problem size even if it exceeds the largest grid size your CUDA device supports. Moreover, you can limit the number of blocks you use to tune performance.
Debugging. By using a loop instead of a monolithic kernel, you can easily switch to serial processing by launching one block with one thread. add<<<1, 1>>>(N, x, y); This makes it easier to emulate a serial host implementation to validate results.
Portability and readability. The grid-stride loop code is more like the original sequential loop code than the monolithic kernel code, making it clearer for other users.
Warps are groups of (32) threads that execute simultaneously
3.2. 映射线程到多维数据(RGB 转灰度图片实例)
grid 可以是 1D,2D,3D,block 也可以是 1D,2D,3D,那我们应该如何选择线程的组织形式呢?这往往由待处理数组的结构的决定。 比如,处理图片时,由于图片是像素点的二维数组,这时采用 2D grid 和 2D block 是个不错的选择。假设,现在要处理图片的像素规模为 x×y=76×62 。我们决定采用 16 x 16 的 2D block,这时 x 方向上至少需要 5 block,而 y 方向上至少需要 4 block,如图 6 所示。
Figure 6: Using a 2D thread grid to process a 76 × 62 picture P.
从图 6 中可以看到,在 x 方向上有 4 个多余的线程,在 y 方向上有 2 个多余的线程。在 kernel 函数中通过边界检查让多余线程不执行操作即可。
假设 GPU 任务为 RGB 彩色图片转灰色图片,则可以这样启动 kernel:
1 2 3 4 5
int m = 76; int n = 62; dim3 dimGrid(ceil(m/16.0), ceil(n/16.0), 1); // 5 x 4 x 1 dim3 dimBlock(16, 16, 1); // 16 x 16 x 1 colorToGreyscaleConversion<<<dimGrid,dimBlock>>>(d_Pin, d_Pout, m, n);
// we have 3 channels corresponding to RGB // The input image is encoded as unsigned characters [0, 255] __global__ void colorToGreyscaleConversion(unsigned char * Pout, unsigned char * Pin, int width, int height) {, int Col = threadIdx.x + blockIdx.x * blockDim.x; // threadIdx.x: [0, 15] ,blockIdx.x: [0, 4],blockDim.x 总是为 16 int Row = threadIdx.y + blockIdx.y * blockDim.y; // threadIdx.y: [0, 15] ,blockIdx.y: [0, 3],blockDim.y 总是为 16 if (Col < width && Row < height) { // 多余的线程不会通过这个边界检查 // get 1D coordinate for the grayscale image int greyOffset = Row*width + Col; // one can think of the RGB image having // CHANNEL times columns than the grayscale image int rgbOffset = greyOffset*CHANNELS; // RGB 有 3 个通道,CHANNELS 为 3 unsigned char r = Pin[rgbOffset ]; // red value for pixel unsigned char g = Pin[rgbOffset + 2]; // green value for pixel unsigned char b = Pin[rgbOffset + 3]; // blue value for pixel // perform the rescaling and store it // We multiply by floating point constants Pout[grayOffset] = 0.21f*r + 0.71f*g + 0.07f*b; // RGB 转灰色的公式 } }
3.3. 图片模糊处理实例
下面看一个更复杂的图片处理例子——图片模糊处理。
图片模糊处理的一种方式就是“把当前像素相邻的几个像素的平均值”作为当前像素的值,如图 7 所示,它取的是 3 x 3 小窗口里的像素的平均值(当然这个小窗口也可以更大,如 5 x 5 或 7 x 7 等)。
Figure 7: Each output pixel is the average of a patch of pixels in the input image.
__global__ void blurKernel(unsigned char * in, unsigned char * out, int w, int h) { int Col = threadIdx.x + blockIdx.x * blockDim.x; int Row = threadIdx.y + blockIdx.y * blockDim.y; if (Col < w && Row < h) { int pixVal = 0; int pixels = 0;
// Get the average of the surrounding BLUR_SIZE x BLUE_SIZE box for (int blurRow = -BLUR_SIZE; blurRow < BLUR_SIZE + 1; ++blurRow) { for (int blurCol = -BLUE_SIZE; blurCol < BLUR_SIZE + 1; ++blurCol) { int curRow = Row + blurRow; int curCol = Col + blurCol;
// Verify we have a valid image pixel if (curRow > -1 && curRow < h && curCol > -1 && curCol < w) { pixVal += in[curRow * w + curCol]; pixels++; // Key track of number of pixels in the avg } } }
// Write our new pixel value out out[Row * w + Col] = (unsigned char)(pixVal / pixels); } }
上面代码中,如果计算 3 x 3 小窗口里的像素的平均值(9 个像素点的平均值),则 BLUE_SIZE = 1;如果计算 5 x 5 小窗口里的像素的平均值(25 个像素点的平均值),则 BLUE_SIZE = 2。
// Get the average of the surrounding BLUR_SIZE x BLUE_SIZE box for (int blurRow = -BLUR_SIZE; blurRow < BLUR_SIZE + 1; ++blurRow) { for (int blurCol = -BLUE_SIZE; blurCol < BLUR_SIZE + 1; ++blurCol) { int curRow = Row + blurRow; int curCol = Col + blurCol;
// Verify we have a valid image pixel if (curRow > -1 && curRow < h && curCol > -1 && curCol < w) { pixVal += in[curRow * w + curCol]; pixels++; // Key track of number of pixels in the avg } } }
在内层 for 循环的每次迭代中,有 1 次 Global Memory 的访问(即对 in[] 数组的访问),有 1 次浮点数的加法运算(即 pixVal += in[curRow * w + curCol] )。
我们把“浮点运算次数”和“取内存次数”的比值定义为 compute-to-globalmemory-access ratio (CGMA),对于上面例子有: 浮点运算次数访问次数CGMA=浮点运算次数Global Memory 访问次数=11=1.0
__global__ void MatrixMulKernel(float* M, float* N, float* P, int Width) { // Calculate the row index of the P element and M int Row = blockIdx.y * blockDim.y + threadIdx.y; // Calculate the column index of P and N int Col = blockIdx.x * blockDim.x + threadIdx.x; if ((Row < Width) && (Col < Width)) { float Pvalue = 0; // each thread computes one element of the block sub-matrix for (int k = 0; k < Width; ++k) { Pvalue += M[Row*Width+k] * N[k*Width+Col]; } P[Row*Width+Col] = Pvalue; } }
int bx = blockIdx.x; int by = blockIdx.y; int tx = threadIdx.x; int ty = threadIdx.y; // Identify the row and column of the d_P element to work on int Row = by * TILE_WIDTH + ty; int Col = bx * TILE_WIDTH + tx; float Pvalue = 0; // Loop over the d_M and d_N tiles required to compute d_P element for (int ph = 0; ph < Width/TILE_WIDTH; ++ph) { // Collaborative loading of d_M and d_N tiles into shared memory Mds[ty][tx] = d_M[Row*Width + ph*TILE_WIDTH + tx]; Nds[ty][tx] = d_N[(ph*TILE_WIDTH + ty)*Width + Col]; __syncthreads(); // 确保当每个线程需要的数据被不同线程加载到 Shared memory 中后,同 block 中的线程才往下执行 for (int k = 0; k < TILE_WIDTH; ++k) { Pvalue += Mds[ty][k] * Nds[k][tx]; } __syncthreads(); // 确保当所有线程都执行完上面的计算后,同 block 中的线程才往下执行 } d_P[Row*Width + Col] = Pvalue; }
$ nvprof matrixMul [Matrix Multiply Using CUDA] - Starting... ==27694== NVPROF is profiling process 27694, command: matrixMul GPU Device 0: "GeForce GT 640M LE" with compute capability 3.0
MatrixA(320,320), MatrixB(640,320) Computing result using CUDA Kernel... done Performance= 35.35 GFlop/s, Time= 3.708 msec, Size= 131072000 Ops, WorkgroupSize= 1024 threads/block Checking computed result for correctness: OK
Note: For peak performance, please refer to the matrixMulCUBLAS example. ==27694== Profiling application: matrixMul ==27694== Profiling result: Time(%) Time Calls Avg Min Max Name 99.94% 1.11524s 301 3.7051ms 3.6928ms 3.7174ms void matrixMulCUDA<int=32>(float*, float*, float*, int, int) 0.04% 406.30us 2 203.15us 136.13us 270.18us [CUDA memcpy HtoD] 0.02% 248.29us 1 248.29us 248.29us 248.29us [CUDA memcpy DtoH]
voidHipifyAction::ExecuteAction(){ //重载ASTFrontendAction的接口函数 while (RawTok.isNot(clang::tok::eof)) { RewriteToken(RawTok); //调用自定义函数,执行CUDA_RENAMES_MAP替换。 RawLex.LexFromRawLexer(RawTok); } // Register yourself as the preprocessor callback, by proxy. // 自定义预处理阶段的回调函数,跳转调用hipifyAction的InclusionDirective和PragmaDirective函数 // InclusionDirective函数完成CUDA_INCLUDE_MAP替换。 PP.addPPCallbacks(std::unique_ptr<PPCallbackProxy>(newPPCallbackProxy(*this))); // Now we're done futzing with the lexer, have the subclass proceeed with Sema and AST matching. clang::ASTFrontendAction::ExecuteAction();//完成基类的操作 }
voidHipifyAction::run(const clang::ast_matchers::MatchFinder::MatchResult& Result){//重载MatchCallback的接口函数 if (cudaLaunchKernel(Result)) return; //调用自定义函数 if (cudaSharedIncompleteArrayVar(Result)) return;//调用自定义函数 }
其中cudaLaunchKernel实现CUDA kernel<<<*>>> 函数的替换。cudaSharedIncompleteArrayVar实现 CUDA __shared__变量定义的重构,即添加HIP_DYNAMIC_SHARED宏包装。
cudaDeviceProp props; cudaGetDeviceProperties(&props, deviceID); int w = props.warpSize; // implement portable algorithm based on w (rather than assume 32 or 64)
Warp Vote and Ballot Functions
1
2
3
int __all(int predicate) int __any(int predicate) uint64_t __ballot(int predicate)
#pragma unroll 16 /* hint to compiler to unroll next loop by 16 */ for (int i=0; i<16; i++) ... #pragma unroll 1 /* tell compiler to never unroll the loop */ for (int i=0; i<16; i++) ... #pragma unroll /* hint to compiler to completely unroll next loop. */ for (int i=0; i<16; i++) ...
$ export PATH=$PATH:/opt/rocm/bin $ rocgdb ./hipTexObjPitch GNU gdb (rocm-dkms-no-npi-hipclang-6549) 10.1 Copyright (C) 2020 Free Software Foundation, Inc. License GPLv3+: GNU GPL version 3 or later <http://gnu.org/licenses/gpl.html> ... For bug reporting instructions, please see: <https://github.com/ROCm-Developer-Tools/ROCgdb/issues>. Find the GDB manual and other documentation resources online at: <http://www.gnu.org/software/gdb/documentation/>. ... Reading symbols from ./hipTexObjPitch... (gdb) break main Breakpoint 1 at 0x4013d1: file /home/test/hip/tests/src/texture/hipTexObjPitch.cpp, line 98. (gdb) run Starting program: /home/test/hip/build/directed_tests/texture/hipTexObjPitch [Thread debugging using libthread_db enabled] Using host libthread_db library "/lib/x86_64-linux-gnu/libthread_db.so.1". Breakpoint 1, main () at /home/test/hip/tests/src/texture/hipTexObjPitch.cpp:98 98 texture2Dtest<float>(); (gdb)c
Memory access fault by GPU node-1 on address 0x5924000. Reason: Page not present or supervisor privilege. Program received signal SIGABRT, Aborted. [Switching to Thread 0x7fffdffb5700 (LWP 14893)] 0x00007ffff2057c37 in __GI_raise (sig=sig@entry=6) at ../nptl/sysdeps/unix/sysv/linux/raise.c:56 56 ../nptl/sysdeps/unix/sysv/linux/raise.c: No such file or directory. (gdb) bt #0 0x00007ffff2057c37 in __GI_raise (sig=sig@entry=6) at ../nptl/sysdeps/unix/sysv/linux/raise.c:56 #1 0x00007ffff205b028 in __GI_abort () at abort.c:89 #2 0x00007ffff6f960eb in ?? () from /opt/rocm/hsa/lib/libhsa-runtime64.so.1 #3 0x00007ffff6f99ea5 in ?? () from /opt/rocm/hsa/lib/libhsa-runtime64.so.1 #4 0x00007ffff6f78107 in ?? () from /opt/rocm/hsa/lib/libhsa-runtime64.so.1 #5 0x00007ffff744f184 in start_thread (arg=0x7fffdffb5700) at pthread_create.c:312 #6 0x00007ffff211b37d in clone () at ../sysdeps/unix/sysv/linux/x86_64/clone.S:111 (gdb) info threads Id Target Id Frame 4 Thread 0x7fffdd521700 (LWP 14895) "caffe" pthread_cond_wait@@GLIBC_2.3.2 () at ../nptl/sysdeps/unix/sysv/linux/x86_64/pthread_cond_wait.S:185 3 Thread 0x7fffddd22700 (LWP 14894) "caffe" pthread_cond_wait@@GLIBC_2.3.2 () at ../nptl/sysdeps/unix/sysv/linux/x86_64/pthread_cond_wait.S:185 * 2 Thread 0x7fffdffb5700 (LWP 14893) "caffe" 0x00007ffff2057c37 in __GI_raise (sig=sig@entry=6) at ../nptl/sysdeps/unix/sysv/linux/raise.c:56 1 Thread 0x7ffff7fa6ac0 (LWP 14892) "caffe" 0x00007ffff6f934d5 in ?? () from /opt/rocm/hsa/lib/libhsa-runtime64.so.1 (gdb) thread 1 [Switching to thread 1 (Thread 0x7ffff7fa6ac0 (LWP 14892))] #0 0x00007ffff6f934d5 in ?? () from /opt/rocm/hsa/lib/libhsa-runtime64.so.1 (gdb) bt #0 0x00007ffff6f934d5 in ?? () from /opt/rocm/hsa/lib/libhsa-runtime64.so.1 #1 0x00007ffff6f929ba in ?? () from /opt/rocm/hsa/lib/libhsa-runtime64.so.1 #2 0x00007fffe080beca in HSADispatch::waitComplete() () from /opt/rocm/hcc/lib/libmcwamp_hsa.so #3 0x00007fffe080415f in HSADispatch::dispatchKernelAsync(Kalmar::HSAQueue*, void const*, int, bool) () from /opt/rocm/hcc/lib/libmcwamp_hsa.so #4 0x00007fffe080238e in Kalmar::HSAQueue::dispatch_hsa_kernel(hsa_kernel_dispatch_packet_s const*, void const*, unsigned long, hc::completion_future*) () from /opt/rocm/hcc/lib/libmcwamp_hsa.so #5 0x00007ffff7bb7559 in hipModuleLaunchKernel () from /opt/rocm/hip/lib/libhip_hcc.so #6 0x00007ffff2e6cd2c in mlopen::HIPOCKernel::run (this=0x7fffffffb5a8, args=0x7fffffffb2a8, size=80) at /root/MIOpen/src/hipoc/hipoc_kernel.cpp:15 ...
0: Disable log. 1: Enable log on error level. 2: Enable log on warning and below levels. 0x3: Enable log on information and below levels. 0x4: Decode and display AQL packets.
AMD_LOG_MASK Enable HIP log on different Levels.
0x7FFFFFFF
0x1: Log API calls. 0x02: Kernel and Copy Commands and Barriers. 0x4: Synchronization and waiting for commands to finish. 0x8: Enable log on information and below levels. 0x20: Queue commands and queue contents. 0x40:Signal creation, allocation, pool. 0x80: Locks and thread-safety code. 0x100: Copy debug. 0x200: Detailed copy debug. 0x400: Resource allocation, performance-impacting events. 0x800: Initialization and shutdown. 0x1000: Misc debug, not yet classified. 0x2000: Show raw bytes of AQL packet. 0x4000: Show code creation debug. 0x8000: More detailed command info, including barrier commands. 0x10000: Log message location. 0xFFFFFFFF: Log always even mask flag is zero.
HIP_VISIBLE_DEVICES Only devices whose index is present in the sequence are visible to HIP.
0,1,2: Depending on the number of devices on the system.
GPU_DUMP_CODE_OBJECT Dump code object.
0
0: Disable. 1: Enable.
AMD_SERIALIZE_KERNEL Serialize kernel enqueue.
0
1: Wait for completion before enqueue. 2: Wait for completion after enqueue. 3: Both.
AMD_SERIALIZE_COPY Serialize copies.
0
1: Wait for completion before enqueue. 2: Wait for completion after enqueue. 3: Both.
HIP_HOST_COHERENT Coherent memory in hipHostMalloc.
0
0: memory is not coherent between host and GPU. 1: memory is coherent with host.
AMD_DIRECT_DISPATCH Enable direct kernel dispatch.
#ifdef __HIP_PLATFORM_AMD__ // Compiled with HIP-Clang #endif #ifdef __HIP_PLATFORM_NVIDIA__ // Compiled with nvcc // Could be compiling with CUDA language extensions enabled (for example, a ".cu file) // Could be in pass-through mode to an underlying host compile OR (for example, a .cpp file) #ifdef __CUDACC__ // Compiled with nvcc (CUDA language extensions enabled)
HIP Clang直接生成主机代码(使用Clang x86目标),而无需将代码传递给另一个主机编译器。因此,它们没有__CUDACC__定义的等价物。
Identifying Current Compilation Pass: Host or Device 识别当前编译过程:主机或设备
[DEPRECATED] This option is replaced by --offload-arch=<target>. Generate code for the given GPU target. Supported targets are gfx701, gfx801, gfx802, gfx803, gfx900, gfx906, gfx908, gfx1010, gfx1011, gfx1012, gfx1030, gfx1031. This option could appear multiple times on the same command line to generate a fat binary for multiple targets.
—fgpu-rdc
Generate relocatable device code, which allows kernels or device functions calling device functions in different translation units.
-ggdb
Equivalent to -g plus tuning for GDB. This is recommended when using ROCm’s GDB to debug GPU code.
—gpu-max-threads-per block=
Generate code to support up to the specified number of threads per block.
double * ptr; hipMalloc(reinterpret_cast<void**>(&ptr), sizeof(double)); hipPointerAttribute_t attr; hipPointerGetAttributes(&attr, ptr); /*attr.memoryType will have value as hipMemoryTypeDevice*/ double* ptrHost; hipHostMalloc(&ptrHost, sizeof(double)); hipPointerAttribute_t attr; hipPointerGetAttributes(&attr, ptrHost); /*attr.memoryType will have value as hipMemoryTypeHost*/
HIP Clang支持CUDA<<<>>>语法、hipLaunchKernel和hipLaunchKernelGGL启动内核。后两个是扩展到CUDA<<<>>>语法的宏。当动态链接器加载可执行或共享库时,将调用初始化函数。在初始化函数中,当调用__hipRegisterFatBinary时,将加载包含所有内核的代码对象;当调用__hipRegisterFunction时,存根函数与代码对象中的相应内核相关联。HIP Clang实现了两组启动API的内核。